AI Services Guide

Overview
With Affino, you can be up and running with your first AI’s in a few minutes and then it takes a couple of hours for you to have your first prototypes indexed and up and running.
Once you are happy with your prototypes, get in touch and we will agree the level of AI service you will be moving to and issue the AI Service Key(s) so you can roll the AI(s) out at scale.
This help guide gets you started with Affino AI and it is in practice very simple to set up your first AI on Affino. Simply create an AI Profile and assign it to a Channel with a single column skin.
Once this is done you can work on improving it from there, with more refined content, system role, settings, AI Skin and more. For details see below.
The steps you need to take are outlined in this guide, but in essence you need to:
1.- Set up the AI Profile
2.- Create the AI Channel
3.- Test the Support Chat with pertinent question
4.- Check out the user feedback on the AI Report
5.- Consult the AI Dashboard
How it Works
Affino lets you create an AI channel which is the AI Chat application that will feed on the content set on the related AI Profile.
The profile allows you to configure the AI Chat per your requirements.
Once set up, users will have access to an AI Chat which takes its content from the section set on the AI Profile, their questions will make the AI query and interpret the content back to the user. Users can report their experiences and rate the answers, in turn, your internal staff will see all the usage stats on the Control Centre.
You can create one or more Expert AI's in a breeze.
Note: the Affino AI does not work on staging sites because the related scheduled tasks are not running. This is to prevent the excessive consumption of AI tokens.
You can test on your live instance by securing the AI channel and/or setting the Member Question Limit to 0 for specific security groups.
Setup: AI Profile
Settings > AI Profiles > (Add/Edit)
AI Profiles are the building blocks of AI within Affino it’s here you can centrally control all aspects of you AI applications. This is where you define how it works, looks, who can access it and how much they can use it, and what articles and forums to use as the basis for the training data for each AI service.
Main Panel
- Name: Enter a name for your AI Profile
- Description - Enter a description for your AI application. This will be viewable on the AI Profile Detail screen only and is for admins
- Introduction: Enter an Introduction for your AI application (this will be shown on the display-side Channel, add inline for both desktop and mobile views)
- Logo - Select the optional logo you want to display at the top of AI navigation bar. Using the logo greatly simplifies your AI Channel skin as you may not need a header and simply use the logo instead
- Logo URL - Enter an optional link for the user to be taken to when they click on the logo
- Chat Avatar: Upload an image used by the AI application as its system avatar
AI Service Management Panel
- AI Service Key: By default you can set up an AI Chat application to query 50 of the latest articles/forum threads per day. Should you require larger data sets, please contact your Affino representative to request an AI Service Key, Note: this will require additional investment
AI Settings Panel
- Large Language Model - Select the Large Language Model (LLM) to be used for your AI Application. This list contains the most up to date AI Models integrated with Affino at the time of writing this guide GPT-4o is the most advanced model available, there are plans to integrate a large number of models in the future to allow for preference to have an impact
- Embedding Types - Select the Embedding Types you want your content to be embedded with. When content is indexed into a form more suited for AI to work with quickly it’s called embedding, embedding can have thousands of dimensions meaning embeds can relate to each other in many ways so it’s like giving AI a way to "see" and "relate" different ideas from your content in a way that makes sense to it. When selected these state which embedding types will be used when indexing your content for AI use, it’s possible to embed for multiple types here but this should only be used very deliberately as this can use more tokens than necessary for the majority of users
- Active Embedding Type - Select the Embedding Type to be used for your AI Application. This is which Embedding Type the AI application will actively use to retrieve information from
- Conversation Context Safeguard - This is a fundamental attribute for the AI Profile. When enabled, the AI will provide all answers exclusively based on the conversation and context provided to it. This means that the only data it has to work from is the questions, answers, and the date lookups which have been sent through. Along with any additional context such as the current data and time. Deselecting this means that you can additionally permit the AI to pull in ouside contexts it has access to, which can be useful for some scenarios but highly detrimental for others. Only disable this attribute if you are fully aware of the implications and impact it can have for your services. Use the System Role to provide a more specific lock-down and focus of the AI service you are providing
- Conversation Context Test Security Group - Select a test security group for disabling the conversation context safeguard option. This will allow a small group of users to test the AI Service without the safeguard in place to ensure that adequate definitions and restrictions are in place in the System Role to make this public. Once the Conversation Context Safeguard is disabled then everyone will have access restricted only by the system role
- Distance - Enter the Distance for how close to the answer you want the AI DB results to be. Note that a distance of 0 is an exact match and 1.2 is a good starting point. Adjust the distance level up and down depending on the level of accuracy and volume of content you have. To explain this further than the help text covers AI Distance refers to how different two things are based on their features, measured using artificial intelligence (AI). It is often used in machine learning and data analysis to compare objects, texts, images, or numbers. AI distance here allows the AI to take two embeddings and determine them to be similar the higher the number the more related embeddings the AI can find to the question however the downside of distance can mean that too much data is found to be similar and can lead to inaccurate answers. As the help text states, Affino recommends you start with 1.2 and adjust it up and down to compare answers in testing
- Number Of AI Data Results - Enter in the number of results you wish to pull in from the AI database for each question. Note that the more results you pull each time the less precise they might be, however in the event it is a directory based AI and you want to return 50 results you might want to set it at 50. Adjust to best fit your requirements. This helps you control the amount of information sent with the question, this is useful because of the range of uses that an AI profile might be used in. Sending lots of embeddings may give the AI higher contextual awareness, better handling of complex queries and increased redundancy however it comes at the cost of higher computational cost in the form of tokens and dilution of relevance. Sending fewer embeddings will help give you more focused and concise responses, lower latency and is a more efficient use of tokens but comes are the risk of missing important context with a lack of redundancy. Best practice involves finding the right balance for your information
- Topic Indexing - Select to enable Topic Indexing on the content for the AI. Note this uses the BM-25 approach to indexing and we may simply bake this into the core Affino AI service if it becomes clear that this approach is universally beneficial. Note also that enabling this if it has been disabled will require reindexing of your content and could use a significant number of tokens depending on the content volume. It is expected to provide better answers overall.
- Reranking - Select to enable Reranking on the searched content being passed through to the LLM. Note that for the reranking we are using GPT-4o for now, but this might change in the future. Note enabling this option will use up some additional tokens and add a small amount of time to re-sort the data being passed through to the LLM. It is expected to provide better answers overall
- Contextual Retrieval - Select to enable Contextual Retrieval on the searched content being passed through to the LLM. In essence when enabled Affino will use AI Tokens to get an LLM to provide additional context on the content being provided to the LLM by adding a summary that is passed through to the LLM along with each data chunk. You can select the LLM you wish to use to generate the context. Note also that enabling this if it has been disabled will require reindexing of your content and could use a significant number of tokens depending on the content volume. It is expected to provide better answers overall.
- Contextual Retrieval Prompt - Update the prompt for the contextual retrieval. Note that a poorly worded prompt will in effect render all the contextual data unusable. Note also that if you do change the prompt all the contextual data will be reindexed, so only update if essential. The default prompt at the time of writing this is “Summarize the following document in maximum 100 words, while keeping the key detail including what screens are covered in the guide and what the key elements are. The summary should be concise but retain the most critical information.”
- Contextual Large Language Model - Select the LLM you wish to use to provide the context. Contextual Retrieval has been promoted to be used with Claude, but we do not currently have a recommendation
- Additional AIs In Navigation - Select additional AIs to present on the AI navigation menu, allowing you to link to other AIs. Note that the Channel security applies, and users will only see the AIs that they have access to
- Enable Recent Content Filter: Select to enable the Recent Content tickbox on the AI application. This will enable the user to choose to only search for recent content within a set time frame
- Recent Content Time Frame: Enter the number of weeks to instruct the AI application of the time frame to consider for recent content
Security
- Debug Security Group - Select a Debug Security Group to access the Debug mode on the each AI applications. Note: the Debug button is not available on Popup Chat facility, only on the Channel view.
- System Role Security Group - Select a System Role Security Group to configure the System Role (prompt) on the AI application. Note: this feature is not available on Popup Chat facility, only on the Channel view. Ensure you maintain the same format as the default system role to prevent the AI application erroring out
- AI Reporting Security Group - Select the Security Group that can view the Questions, Responses and Feedback from this AI Profile on the AI Report, Contact and Account screens. This could be used to prevent some users / staff from viewing sensitive information
Member Question Limit Panel
- Member Question Limit - Select how many searches each member group (security group) can use. This is a multiple row setting and can limit different security groups by questions over a defined period of Day, Week, Month or Year.
- Enable Guest Use - Select if you wish for guest users to be able to ask questions of the AI. Note that this can be highly risky and could rapidly use AI Tokens in a costly manner; expose your content to scraping; and bad actors could use this intensive service as a means to attack your site and services. You will need to review the: Guest User AI Chat Activity Limit setting in System Settings to set the overall limits on how Guest users access your Guest AIs. Note that this is the only limit which applies to Guest users, so only enable Guest Use on the AI where you want anonymous users and potentially bots to have unlimited access to your AI.
- Enable Bot Use - Select if you wish for bots to be able to ask questions of the AI. Note that this can be highly risky and could rapidly use AI Tokens in a costly manner; expose your content to scraping; and bad actors could use this intensive service as a means to attack your site and services. The Bots follow the same rules as the Guest Use Limit. Note that with this setting enabled you have a high possibility of using a large number of tokens, so be fully aware of the potential cost implications before enabling. Note also that Affino cannot always detect bots in the short term.
- Bot Notice - Enter the notice which is displayed to Bots, or occasionally humans who have been classified as bots owing to their behaviour or of that of others on the same IP Address as they are using. The default Bot Notice is “You have been identified as a Bot, this AI is only available to humans. If you are in fact a human please contact support to highlight that you have been mis-identified as a bot.”
- Chat History Timeout - Enter the number of days the chat history is retained for a user, maximum limit of 90.
- Chat History Limit - Enter the number of conversations retained in the chat history, maximum limit of 100.
Content Sources
- Channel Content Sources - Channel - Select the Channel detail content to be included in the AI. Note this is purely the Channel Name, Teaser and Details fields and not any sub content, e.g. articles. This is useful when setting up unified content and production workflows for content, sales, marketing, event teams etc.
- Section Content Sources – Section - Select the Section detail content to be included in the AI. Note this is purely the Channel Name, Teaser and Detail 1, Detail 2 fields and not any sub content, e.g. articles. This is useful when setting up unified content and production workflows for content, sales, marketing, event teams etc
- Article Content Sources - Select the Section and duration for the indexing of content. Multidisplayed articles will be included. This is a multi-row setting and allows you to include sections and limit the content by time frame per row. Please note that changing the sections could incur a considerable use of AI tokens and therefore an increased cost. Only change this if you're certain this should be changed.
- Article Content Security Rights - Select the Content Security Right of the articles you wish to index and include in the AI. If you also wish to include unsecured content select the option below.
- Include Unsecured Content - Select to index unsecured content. You can have a mix of secured and unsecured content by selecting both this and the option above.
- Exclude Sponsored Articles - Select to exclude sponsored articles being indexed. This means any sponsored articles from all selected Sections.
- Exclude Rating - When selected the ratings for the articles, in particular reviews will not be shared with the LLM and therefore not included in the reasoning or answer. E.g. if not enabled someone could ask for five star or good productions of Hamlet, and the AI has the rating awareness. When this setting is turned off that data is not passed to the LLM. Note this can be enabled and disabled without needing to reindex the content.
- Max Topics Indexed - Enter the maximum number of topics to be index against each piece of content. There is a limit to the number of characters which can be indexed for each piece of AI content so we are recommending 20 or fewer topics per article. However in exceptional circumstances, e.g. if providing an AI Directory Service, you might wish to increase this limit. An example being a directory where there are potentially 100 countries or other topics assigned to specific pieces of content. It is best to refine the taxonomy to use broader topic groupings if possible, rather than simply applying a large number of topics. For those articles items with higher number of topics, these will NOT include having the topics indexed against them to avoid arbitrarily indexing. It means that if you have a limit of 20 topics and an article has 30 topics then it is still indexed but not with the topics. - Article Topic Filter - Select one or more topics you want to filter the articles included. Note that only articles which are tagged with one or more of the topics selected will be included in the AI. If no topic is selected then this filter will not apply. Note there is a limit of a maximum 20 topics which can be applied to this filter.
- Creator - Select to include the Creator data with the content. This is useful when the content is specifically associated with the Creator, e.g. an opinion piece, bit of training content etc.
- Authors - Select to include the Author data with the content. This is useful when the content is specifically associated with the Authors, e.g. a publication, performance, book description etc.
- Forum Content Sources - Select the Forum and duration for the indexing of content. This is a multi-row setting and allows you to include Forums and limit the content by time frame per row. Please note that changing the sections could incur a considerable use of AI tokens and therefore an increased cost. Only change this if you're certain this should be changed
- Forum Content Security Rights - Select the content security right, this is the View Thread Content Security Right set on each Forum, for the content you wish to include. Only content with the selected securities will be included. If you wish to include unsecured forum content only then do not select any forum content security right.
- AI Content Sources - Additional AI Profile Content - Select to use the content from other AI Profiles. This avoids the same content being indexed multiple times, using excessive amounts of AI Tokens to improve efficiency and cost.
AI Popup
- Popup Chat - Select to enable a popup chat application displayed on selected Channels.
- Chat Channels - Select the channels that the chat application will be made available as a popup chat.
- Chat Title - Enter the title for the chat application.
- Chat Button Image - Upload an image for the button displayed on the chat application.
- Chat Button Text - Enter the text displayed on the button to open the chat application.
- Bot Intro Image - Select an introduction image to promote the chat bot. This will revert to the Chat button once it has collapsed
- Desktop Button Size (Px Only) - Enter the size in pixels you wish to display the button for the AI popup. This should be large enough to be obvious and engaging without been too large so that it is in the way. The size is the number of pixels for the width and height. Default Value – 50
- Mobile Button Size (Px Only) - Enter the size in pixels you wish to display the button for the AI popup on mobile. This should be large enough to be obvious and engaging on mobile without being too large so that it is in the way. The size is the number of pixels for the width and height.
- Align With Prime Content - When selected, rather than align with the left or right hand side of the screen, the alignment shifts to be aligned with the left or right hand side of the Prime Content area. This way if you are for example running Fireplace takeover ads on the page background then the AI button and panel will not overlay the fireplace ad creatives.
- Desktop Button Alignment - Select which side of the screen the AI Popup appears on, when viewed on desktop.
- Mobile Button Alignment - Select which side of the screen the AI Popup appears on, when viewed on mobile.
Desktop Vertical Button Indent - Enter the number of pixels the chat button is indented, this might be required to be positioned away from ads or other key page elements. - Mobile Vertical Button Indent - Enter the number of pixels the chat button is indented, this might be required to be positioned away from ads or other key page elements.
- Desktop Horizontal Button Indent - Enter the number of pixels the chat button is indented, this might be required to be positioned away from ads or other key page elements.
- Mobile Horizontal Button Indent - Enter the number of pixels the chat button is indented, this might be required to be positioned away from ads or other key page elements.
- Button Background Color - Select the background color for the Button.
- Button Animation - Select to enable pulsing on the AI to draw attention to it. It is recommended that this is enabled as otherwise users might miss the AI. Set the frequency below to tune the level of attention you are looking for.
- Design Style - Select the Design Style for the chat application.
Article Questions
- Article Question Mode - Select the Article Question mode required. It is recommended that you start with sample questions. This is to make sure you have the right question generation prompt and have the content to support the questions being generated automatically.
- Show Article Questions - Select to enable article questions for Articles. When enabled, Affino will automatically generate suggested questions for your articles. You will then be able to tweak these questions. Adjust as needed to auto-generate the article questions in the best format for your content. Note that this will potentially use a significant number of tokens if you are generating questions for a large number of articles.
- Question Generation Prompt - This is the AI Prompt used to generate the suggested article questions, ensure that it is for a stated number of article questions, up to 5 per articles. Affino will only use up to 5 questions per article, even if you ask the AI to generate more. Ensure you retain the core structure of the prompt including the | without in any meaningful way changing the prompt. Default Prompt is “Suggest 5 positive questions based on the key subjects of this article, keep each question no more than twelve words, no introduction. Do not create questions like 'what do you think?', instead it is more a case of 'how would this work'. Make sure that you ask a variety of different questions so that no two are similar. The questions should be phrased in a way that an expert system could answer if it had the content available. Check and update the questions to make sure they meet the criteria.”
- Display Article Sections - Select one or more article sections to generate and display the article questions on. The questions will be displayed on the detailed view of each article. Note that each Display Article Section can only be associated with one AI Profile.
- Article Question Placement - Select where to display the Questions on the Article Detail. Note that not all article types support In Article display. If you do select In Article display and it is not supported then the questions will automatically be displayed at the end of the article.
- Article Question Intro - Enter the title / intro shown immediately above the article questions.
Article Question Content Security Right - Select to restrict access to who sees the Article Questions. This is very useful in the early stages when rolling out Article Questions and ensuring that they meet your quality standards, and match the content you have
Site Search
- Search Channel - Select to display an AI results panel on the top of the search results if the AI can provide answers to the question posted. This way you get the benefit of the best results from both the traditional and AI searches. The panel is only displayed if there are positive results in the AI vector database. Since it takes longer to generate the AI panel than to load up the search results, the search results load up first and then the AI panel is displayed after. The panel content will only take into account the search term entered into the search field and not any of the limits and sort logic which applies to the search results. Note that the AI Panel follows the settings as defined on the AI Profile and AI Channel, i.e. only shown to permitted users and bots.
- Initial Character Display Limit - Enter the rough number of characters to be displayed when the AI panel is initially displayed. The user is then presented with a more button and the rest of the content is displayed and the panel expanded to fit the full content. This limit is there to ensure that you have the best balance in how the results are presented
Notifications
- Notification Contacts - Select the users who will be notified when feedback is provided.
- Notifications - Select your preferred notifications for this AI, default Affino sends alerts for questions with feedback or now answer. You will want to regularly review questions and answers so may want to be alerted for all of them. Options for this drop down include Questions with feedback or no answer, Questions with feedback, All questions and No Notifications.
- No Answer Text - Specify the text to look out for in the answer to identify no answer questions to send alerts for. Note that you can determine this in the System Role.
Additional Styling
- Sidebar Background Color - Select the background color for the sidebar.
- Sidebar Text Color - Select the text color within the sidebar.
- Sidebar Highlight Background Color - Select the background highlight color for the sidebar.
- Sidebar Highlight Text Color - Select the highlight text color within the sidebar.
- Sidebar Button Background Color - Select the button background color within the sidebar.
- Sidebar Button Text Color - Select the button text color within the sidebar.
- Sidebar Button Border Color - Select the button border color within the sidebar.
- Sidebar Button Highlight Background Color - Select the button highlight background color for the sidebar.
- Sidebar Button Highlight Text Color - Select the button higlight text color within the sidebar.
- Sidebar Button Highlight Border Color - Select the button highlight border color within the sidebar.
- Popup Top Bar Background Color - Select the popup background color for the topbar.
- Popup Top Bar Text Color - Select the popup text color within the topbar.
Suggested Prompts
- Suggested Prompts are examples of questions that a user can ask the AI, this is a multi-row selector including Prompt Title, Prompt Teaser and the Prompt itself
Footer Text
- Advisory Information - Enter the advisory information that appears below the question to aid the user typing in the question.
- How We Collect Data - Enter the data collection text displayed on the AI Channel.
Reindexing Content
Affino provides several methods that trigger the reindexing of content.
Regenerate AI Data Function:
The "Regenerate AI Data" function on the AI Profile (when in View mode) allows users to reindex the entire AI Data set. This triggers reindexing of all content defined in the AI Profile, refreshing the vector database. It includes an estimate of tokens required and a confirmation dialog to manage resource use.
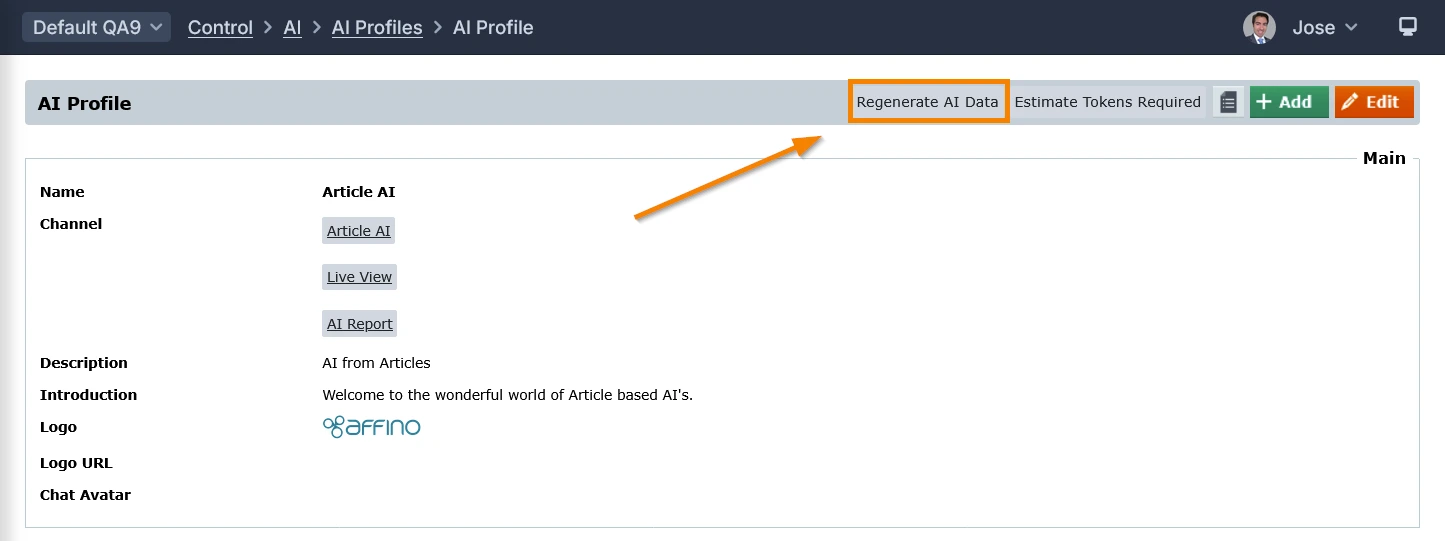
When you click on that function, a warning will appear:
"Confirm if you wish to go ahead with regenerating the AI Data. This involves reindexing all the content defined in the AI Profile and could use up a great number of tokens. To see an estimate of how many tokens first, simply cancel and click the Estimate Tokens Required button to ensure you wish to go ahead with this"
Forced Reindexing on Article Save:
When an article that has been indexed is updated is it automatically reindexed. This ensures that the AI Chat returns the most updated results.
Note: Reindexing can also be triggered when you enable or disable features like "Contextual Retrieval" or "Topic Indexing", which may require reprocessing of content.
Create: AI Chat Channel
Structure > Channels > (Add/Edit) > AI Chat
You need to create an AI Chat channel to host the AI Chat application.
The channel simply needs a skin with a page navigation, the rest of the page is taken up with the AI interface.
You can additionally select which channels the AI is available on as a popup, and which AI’s can be used alongside each other.
Note: you will need to associate the AI Profile to the newly created AI channel
Add AI Search to a Channel
Design > Design Objects > Design Object Editor
You can add the AI Search as a Design Element to any Channel.
Simply add a Design Element of type "Search" to the Channel's Design Object:
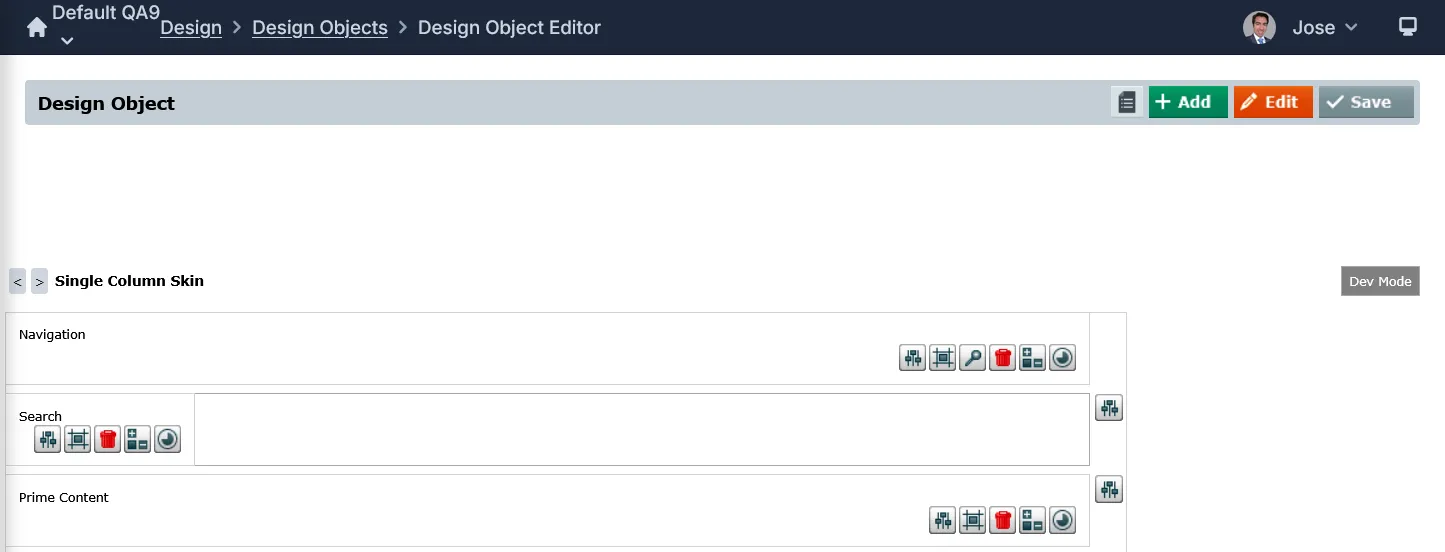
-- and choose AI Search.
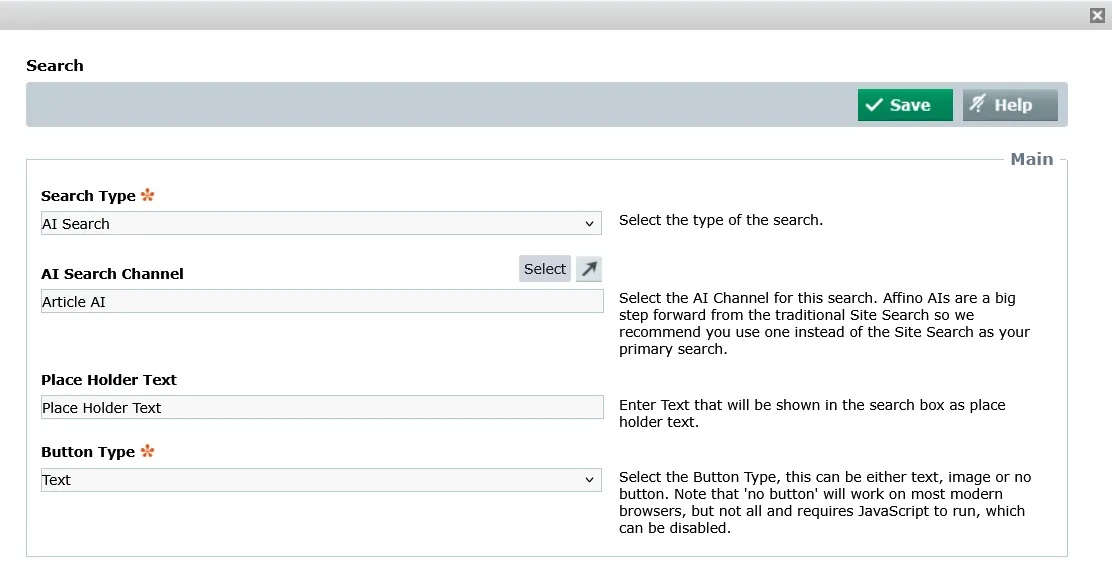
You must choose the AI Channel, together with the Place Holder Text and the Button Type.

Analysis: AI Reporting
The AI Report is a feature that allows users to analyse and report on AI interactions and performance.
It is part of Affino's suite of AI services designed to enhance user engagement and provide insights into AI-driven activities.
The AI Report is used to filter and analyse AI interactions, providing insights into the quality of AI responses and user engagement. It is essential for monitoring AI performance and ensuring that AI services deliver accurate and valuable interactions.
Users can view questions, responses, and feedback from AI interactions, which helps in refining AI services and improving user experience.
Search Filters:
- AI Profile – This allows you to filter listed responses by AI profile. This is a predefined selection field and by clicking into the box it will list all AI profiles on your Affino Instance
- Question – This allows you to search for words used in any given question asked within your search criteria.
- Response – This allows you to search for words used in any given response from an AI within your search criteria.
- Name – This allows you to search for a particular user’s interactions clicking into the box will give you a popup search for contacts on your instance.
- Account – This allows you to filter all responses by the predefined accounts on your instance, interacting with it will give you a popup search for accounts.
- Account type – This allows you to filter all responses by type of account and is a drop down listing all account types on your instance.
- Dates – This allows you to filter all responses with a date range listing all responses made within the selected range here, interacting with it will display a calendar for date range selection.
- Show Feedback Only Rows – This will filter the listing to only display responses with user feedback attached this is a great way to ensure that user feedback is actioned.
- Feedback Text – This allows you to search within the responses with provided feedback for key words.
- Sentiment – This allows you to filter by the response with specific provided sentiments, interacting with this box will display a pop up listing all pre-defined sentiments available to users
- Actioned – This allows you to filter responses by their Action status controlled on this screen, it’s possible to set each response as actioned to allow you to track if a response or feedback has been seen and actioned. It is a dropdown with the options All, Not Actioned and Actioned.
- Activity: filter results using the following options (All, Chat, Search, Article Question and Assistant)
- Export – This allows you to export responses with your selected criteria in xlsx, csv and tsv form
AI Dashboard
The AI Dashboard is the overview of all AI related usage data, here we will take you through the different elements on the dashboard.
AI Profile Selection drop down – Located to the immediate right of the AI Dashboard title we have a drop-down box that controls a filter for each AI Profile allowing us to view only the pertinent statistics for each AI on our site. All is default selected meaning when you enter the AI Dashboard you will be presented with global usage.
Date Range – The Date Range element allows you to control the range of data shown on the graph by date, Past 60 days is default selected here.
Select Chart – The Select Chart drop down located in the top right of the live graph allows you to quickly switch the displayed data on the graph to any of the below Key Statistics for a visual representation of historical data.
Key Statistics
- Users – Unique user count within the current filtered criteria
- Questions Asked – Total number of Questions asked within the current filtered criteria
- Content Upserts – A per day average of the amount of content added or updated in the Vector Database for the AI. A Vector Database is a storage solution for the knowledge base of your AI, information is taken, split in to chunks of various sizes and then organised into thousands of dimensions allowing all related data to be called upon later quickly when a user asks a question
- Vector Count – A Vector is essentially a chunk of your information that would be taken into consideration when a question is asked. Depending on the setting in your AI profile the top 50 Vectors relating to the question asked may be provided to the chosen AI allowing it to return a summary of that information to the user quickly. This count is a good way to show the size of your AI’s knowledgebase, and the historical data can more importantly show you if that knowledge base is growing or shrinking.
- AI Tokens Used – This shows you the count of AI Tokens Used which are how billing is controlled in the AI world. An AI Token can be thought of as approximately 4 characters in English it’s a good indicator of how much computing power an AI is using.
Article Questions
Article questions are designed to enhance reader engagement by allowing them to delve deeper into the topics covered in an article. They are generated by AI and can be reviewed and approved by admins to ensure quality and relevance. This screen is a central place to view and filter all article questions present on your instance.
Search Filters:
- Question - This allows you to search for words used in any generated question on your instance.
- Article Title – This allows you to search for particular words in Article Titles.
- Section – This allows you to filter the listing by section, interacting with it will pop up a Section Search and Selection tool.
- Channel - This allows you to filter the listing by Channel, interacting with it will pop up a Section Search and Selection tool.
- AI Profile - This allows you to filter the listing by Channel, interacting with it will pop up a Section Search and Selection tool.
- Clicks – This allows you to filter the listing by amount of user clicks on each question the options are listed in a dropdown and are All, Zero, > 0, > 10, > 100 and > 1000.
- Created Range – This allows you to filter the listing by a date range specific to the date created for each question.
AI Management
We have put a particular focus on making it simple to manage the content and tweak the AI to optimise the service on an ongoing basis. If any content is updated, removed or added then Affino automatically syncs that with the AI.
You can tweak the User Role (i.e. how the AI behaves) right from the live interface.
You can also dial up and down the level at which you include or exclude the matching of the underlying data for the AI responses since this will vary between AI services you provide.
AI Content Management
All the content can be easily managed through Affino’s CMS, and you can set up inbound content feeds to pull in content from 3rd party sources.
Affino’s debug feature lets you see what underlying content is informing each AI response, meaning you can easily go in and update or exclude the content from the AI.
System Security Rights for AI Management
You will need the following System Security Rights in order to access these AI related screens:
- Site Management for the AI Dashboard
- Community Manager for the AI Report
- Editor for Article Questions
- Site Management for the AI Profile
Did you find this content useful?
Thank you for your input
Thank you for your feedback
Driving business at some of the world's most forward thinking companies


Our Chosen Charity
![]()
Meetings:
Google Meet and Zoom
Venue:
Soho House, Soho Works +
Registered Office:
55 Bathurst Mews
London, UK
W2 2SB
© Affino 2026