Google Analytics Profile

Overview
The purpose of the Google Analytics Profile is to enable seamless integration with Google Analytics for collecting key data required for website analysis.
When a Google Analytics Profile is set up and selected for a specific zone, it adds cookies to the header or footer of each page. These cookies are then declared in the cookie dashboard, listing Google Analytics as a Performance cookie type. This setup allows for the tracking of user interactions and performance metrics on the website, which are essential for understanding user behavior and improving site performance.
The profile ensures that the necessary tracking codes are implemented correctly, facilitating the collection of analytics data without manual intervention on each page.
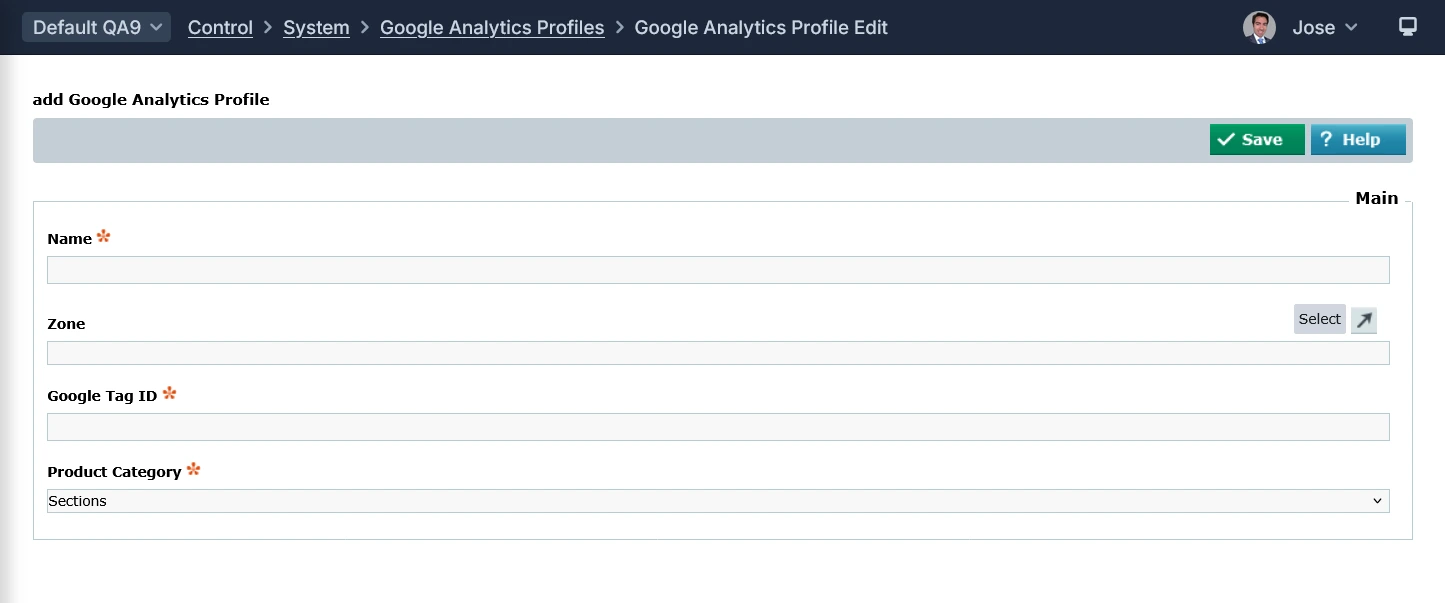
In order to set it up you will need to:
- Set a Name for the Profile (this is for internal purposes only)
- Select which Zone/s it applies to
- Set the GA Tracking Code (e.g. UA-1234567-8)
- Choose the Product Category (usually Sections, but you can also select Channels or Catalogue Item attributes)
Requisites and Dependencies
Requisites
Set up a Google Analytics Account.
Step 1: Set up a Google Analytics Account (if you haven't already)
1. Go to the Google Analytics website: [analytics.google.com/](www.google.com/search?q=https://analytics.google.com/)
2. Click on "Start measuring".
3. You'll be prompted to sign in with your Google account (Gmail or other Google account).
4. Follow the on-screen instructions to set up your Google Analytics account.
This involves:
- Account Setup: Provide an account name (e.g., your business name)
Property Setup:* his represents your website or app. Provide a property name (e.g., your website name), select your reporting time zone, and choose your currency - Google Analytics 4 (GA4) vs. Universal Analytics (UA): Google has transitioned to GA4 as the default. While you might still see options for Universal Analytics in some older accounts, it's highly recommended to set up a Google Analytics 4 property. Universal Analytics stopped processing new data on July 1, 2023.
Step 2: Find Your Google Analytics 4 Tracking Code (Measurement ID)
1. Once you've set up your GA4 property, navigate to the Admin section
2. In the "Property" column, select the GA4 property you just created
3. Click on "Data Streams"
4. Select your web data stream (it will likely be listed under "Web").
5. On the "Web stream details" page, you'll find the **Measurement ID**. This is a string that looks like "G-K7CNLE8PGG".
Once that's done, you can set the Google Analytics 4 Tracking Code on the Google Tag ID field of the profile.
Dependencies
There are really only two dependencies:
- Zone (Site Domain)
- Google Analytics Account / Tracking Code
Google Analytics
Affino integrates with Google Analytics in great dept, allowing for real-time tracking of:
- Active Users: You can see the number of users who are currently active on your site within the last 5 and 30 minutes. This also includes a minute-by-minute breakdown of active users.
- User Engagement: GA4 allows you to monitor how users are interacting with your content as it happens.
- Pageviews/Screen Views: You can track which specific pages of your website or screens of your app users are viewing in real time.
- Events: Any user interactions that you have set up as events (e.g., button clicks, video plays, form submissions, file downloads) are tracked and displayed in real time, showing the count of each event as it occurs.
- Key Events (Conversions): If you have designated certain events as conversions, you can see in real time when users complete these important actions.
- Traffic Sources: You can identify the sources that are currently driving traffic to your site (e.g., organic search, direct, social media, referrals).
- Location: The geographic location (city, country) of your current active users is tracked in real time.
- Device Information: You can see the types of devices (desktop, mobile, tablet) that your active users are using.
- User Properties: If you have configured user properties (attributes about your users like age, gender, or interests), you can analyze your real-time users based on these properties.
- Audience: You can see which of your defined audiences the current active users belong to.
- User Snapshots: GA4 provides the ability to view snapshots of individual user activity in near real-time. This includes details about their device, location, the top events they triggered, and their user properties.
Using eCommerce Goals
There are several goals in GA4 which can be of much use.
These are:
- Registration Goal: Tracks when a user completes a registration form or creates an account on your website
- Purchase Goal: Tracks when a user completes a purchase transaction on your website
- Add to Basket Goal: Tracks when a user adds a product to their shopping cart or basket on your website
How to set them up:
These are typically set up as conversions in GA4. You can configure these events through Google Tag Manager (GTM).
1. Identify the Trigger: Determine what action or page view signifies the completion of each goal (e.g., a "Thank You" page after registration, a purchase confirmation page, or clicking an "Add to Basket" button).
2. Implement Event Tracking
- GTM: Set up tags that fire when the identified trigger occurs. These tags will send event data to GA4. For "Purchase", ensure you are sending the necessary ecommerce parameters like `item_id`, `item_name`, `value`, and `currency`. For "Add to Basket", include `item_id` and `item_name`.
- Direct Code:** Implement the `gtag()` function calls in your website/app's code to send the relevant events and parameters to GA4 upon the trigger action.
3. Mark as Conversion: In your GA4 property, navigate to **Admin** > **Data display** > **Conversions**. Find the events you've set up (they will appear after they've been triggered at least once) and mark the corresponding toggle to "Mark as conversion". You can also proactively create new conversion by specifying the event name.
In summary: define the user action for each goal, track those actions as events in GA4 using GTM or code, and then mark those specific events as conversions within the GA4 interface.
Did you find this content useful?
Thank you for your input
Thank you for your feedback
Driving business at some of the world's most forward thinking companies


Our Chosen Charity
![]()
Meetings:
Google Meet and Zoom
Venue:
Soho House, Soho Works +
Registered Office:
55 Bathurst Mews
London, UK
W2 2SB
© Affino 2026