Registration Profile Guide
The Registration Profile governs what users will see when registering on the site, the contact data that is initially captured and the security during the process. It includes settings for the registration process, such as required fields, security settings, and the overall user experience during registration.
Note: the Registration Profile is focused on capturing the essential details first and optionally collecting additional demographic data in the next step. This approach helps reduce form abandonment and ensures that key contact details are captured early in the process.
Please read the related Demographic Profile Guide.
Registration Screen and Welcome Channel
Registration
- Name: give the profile a name (just for internal use)
- Terms And Conditions: select the current Terms and Conditions for the user to agree to
- Skip Demographic Form: this will eliminate the second screen (Demographic) from the registration process
- Skip Demographic Form On Checkout: this will eliminate the second screen (Demographic) only if a user tries to register after they have added an item to their cart and is going through the Checkout process. Note: if Double Confirm is enabled (recommended) you need to enable the (Send Double Confirm > After Registration) option.
- Personal Screen Name Creation: choose between the user creating their own Screen Name or Affino generating the screen name from their Nickname or their Firstname and Lastname. Note: the Screen Name is what appears on the users’ My Account URL (i.e. affino.com/markuska).
- Allow Personal Screen Name Change: enable this setting so that users can create their own screen name
- Default Country: Select the default country for the registration. If this is selected then the country selector will no longer be displayed, instead only the counties from the country will be on the County menu.
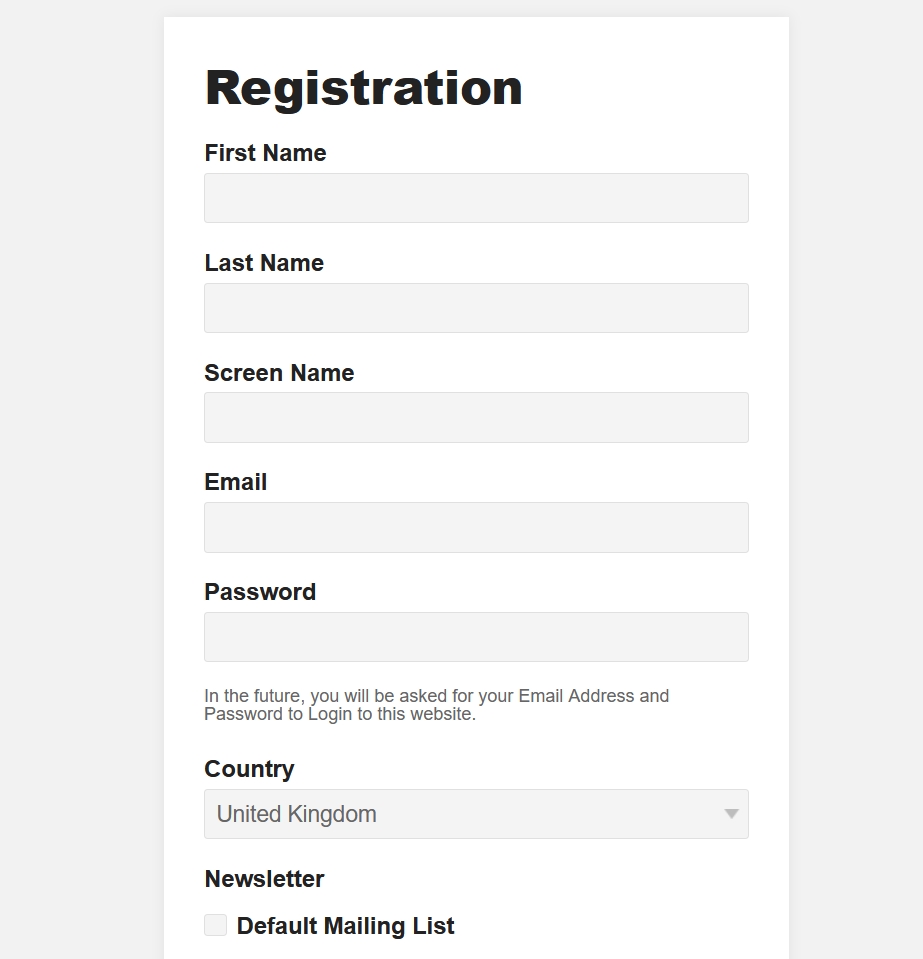
Depending on settings, the end result will be reflected on the Registration form.
Welcome Channel
The Welcome Channel option determines the Channel and Zone where users are redirected to after Registration.
Note: if (Zone > All) is selected, the Welcome channel will be used on all other zones that do not have a specified zone selected. If a user registers during their eCommerce user journey, they will be returned to the next checkout step.
Note: currently (24/04/25), when a user registers, Affino counts that as the first login
Security
Fields and Options:
- User Registration: Tick this box if you want to accept User Registrations through this Website
- Require Administrator Approval: Tick this box to ensure that all Users must be vetted by a Systems Administrator before they have access to this website
- Registration Success Message: Select to enable the Registration Success Message to be sent to registrants and administrators, once the registration form has been completed. If Double Confirm is enabled, this message will be sent after the user has Double Confirmed.
- Default Security Group: Select the default Security Group for registrants. This is the first group for your newly registered users, before they confirm. If Require Administrator Approval is selected, users are granted this Security Group after they are approved.
- Granted Security Group: Select the granted Security Group. If Require Administrator Approval is selected and the user is approved, they will be upgraded to this Security Group, with the Default Security Group removed. If Require Administrator Approval is not selected, registrants will be granted this Security Group.
- Default Display Security Clearance: Select from the drop-down menu the required security clearance that users need to have to see this user's published details.
- Member Types: Select Member Types which will be shown as options for Member Types on Registration Screen
- Member Types Internal Use: Select to hide Member Types from the registration screen and user's profile screen. Users will not be able to select their Member Type on the display side - essentially, it becomes a control side function within User Security.
Form Fields
If enabled, these are the fields that will appear on the Registration Form.
Note: you can set some of those fields to be obligatory
- Title: Select to display the title field in the registration form.
- Title Required: Select to enforce the Title field as mandatory.
- Nickname: Select to have the Nickname field in the registration form.
- Email Confirmation: Select to have the Email Confirmation field in the registration form.
- Password Confirmation: Select to display the Password Confirmation field in the registration form.
- Show Password Intro: Select to display Password Intro text.
- User ID: Select to have the User ID field in the registration form.
- Country: select to have the Country field in the registration form.
- Country Required: select to make users select a country as mandatory.
- County / State: select to have the County / State field in the registration form.
- County / State Required: select to make users select a County / State as mandatory.
- Town / City: select to have the Town / City field in the registration form.
- Town / City Required: select to make users select a Town / City as mandatory.
- Postcode / Zip: Select to have the Postcode / Zip field in the registration form.
- Postcode / Zip Required: Select to make the Postcode / Zip field a mandatory requirement when registering.
- Business Phone: Select to display the Business Phone field in the registration form.
- Business Phone Required: Select to enforce the Business Phone field as mandatory.
- Mobile: Select to have the Mobile field in the registration form.
- Mobile Required: select to make users enter a mobile as mandatory.
- Gender: Select to have the Gender field in the registration form.
- Date Of Birth: Select to have the Date Of Birth field in the registration form.
- Remember Login: Select to have the Remember Login field in the registration form. Remember login will be displayed only under SSL.
- Member Type Required: Select to make the Member Type selection a required field in the registration profile registration screen
- Job Seeker: Select to enable members to indicate whether they are a job seeker or not. If a user unchecks this option it will disable job related profiling for the member.
- Member Type Format: (Tick Box, Radio, Drop-down) Select the format for the Member Type selector. Use Tick Box if you want to let users choose multiple types; choose Radio when there are a small number of distinct options; choose Drop-down if they can only choose one option but there are lots of options.
- Captcha: Select to show Human Captcha box.
- Personal Screen Name: Select to have the Personal Screen Name in the registration form.
- Personal Screen Name Required: Select to make the Personal Screen Name mandatory in the registration form.
- Job Title: Select this to display Job title.
- Job Title Required: Select this to make Job Title Required.
- Responsibilities: Select this to display Responsibilities.
- Responsibilities Required: Select this to make Responsibilities Required.
- Company / Organisation: Select this to display Company / Organisation.
- Company / Organisation Required: Select this to make Company / Organisation Required.
- Twitter ID: Select this to display the Twitter ID Field.
- Twitter ID Required: Select this to make the Twitter ID Required.
- LinkedIn URL: Select this to display the LinkedIn URL Field.
- LinkedIn URL Required: Select this to make the LinkedIn URL Required.
- FaceBook URL: Select this to display the FaceBook URL Field.
- FaceBook URL Required: Select this to make the FaceBook URL Required.
- Affiliate Code: Select this to display Affiliate Code.
- Privacy Selector: select to show Private check box to users.
- Privacy Default Value: Select the default value selected on the Privacy selector.
How to style the obligatory fields on the Registration form:
Control > Design > Design Style > Add/Edit > Error Panel
You can style the obligatory fields on the Registration form (the ones that are highlighted when the user doesnt input a value or a correct value) via the 'Error Panel' settings on the associated 'Design Style'.
- Error Text Color: Select the colour for the text which appears in the error notice panels
- Error Panel Border Color: Select the border colour for the error panels, both at the top of forms and which highlight the form fields where the error occurs
- Error Panel Background Color: Select the background colour for the error panels, both at the top of forms and which highlight the form fields where the error occurs
Member Types
Control > Security > Member Types
Member Types are a classification system used to manage users and their associated permissions and security settings. Member Types are integral to defining what users can access and how they interact with the platform.
Registration and Editing:
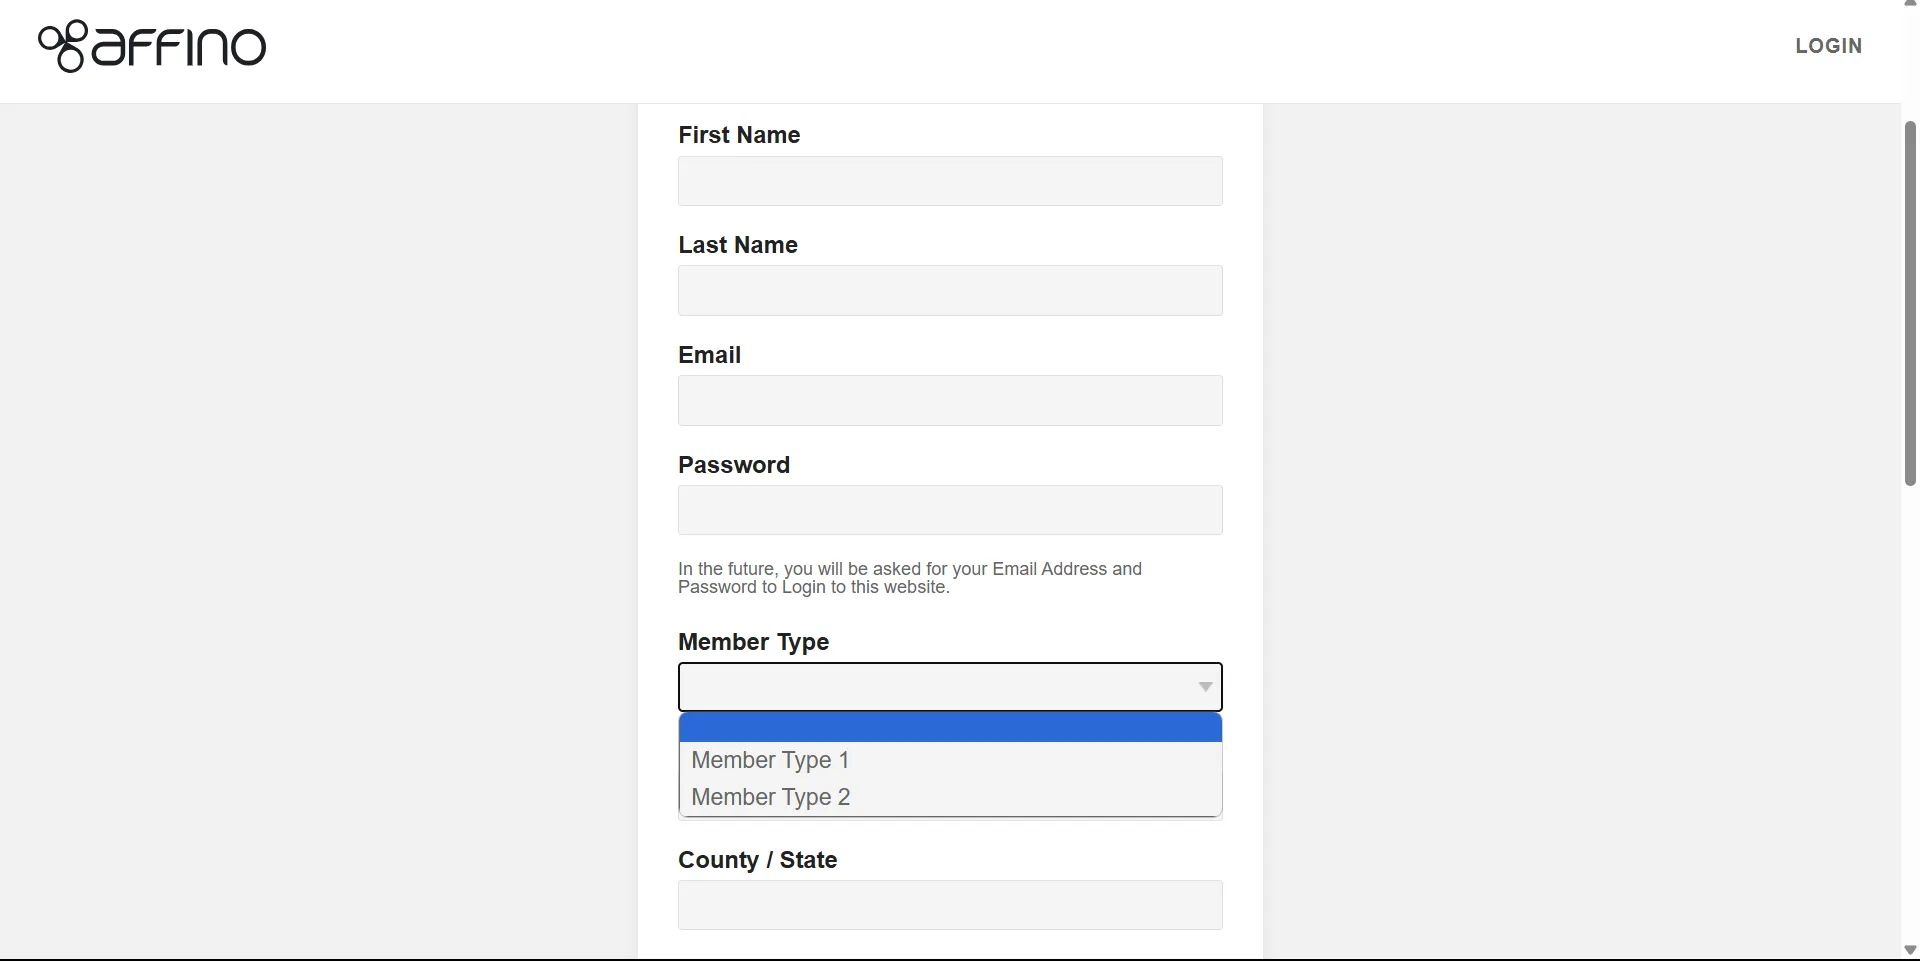
The Member Type can be selected by the user when they register on your site:
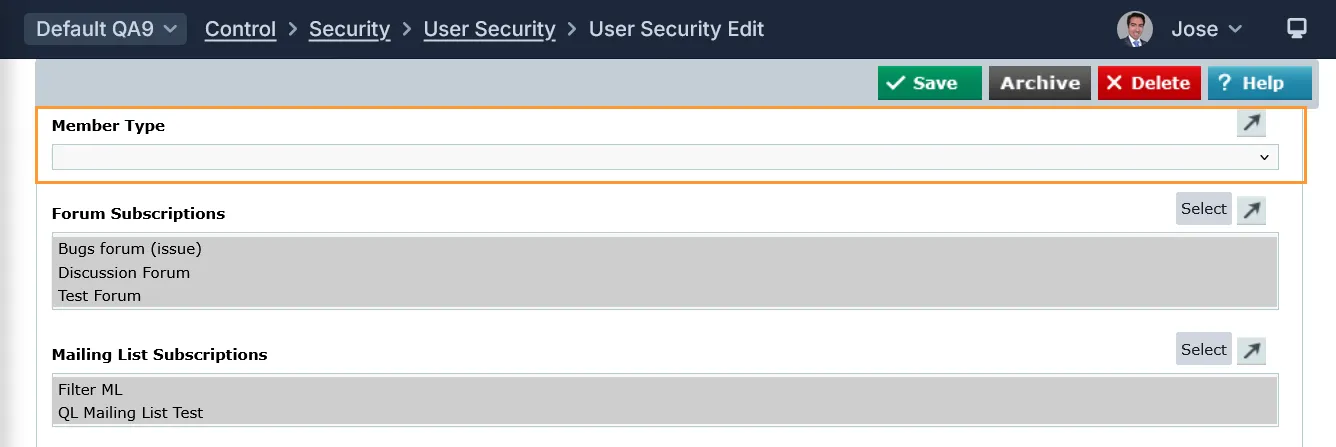
The Affino admin can also edit a user from the User Security screen and set (add or change) a Member Type:
Security Group Association:
Member Types can be linked to specific security groups, which determine the level of access a user has. For example, a user with a "Registered User" Member Type might be associated with a "RegUsers" security group, while a "Moderator" Member Type might be linked to a "Moderators" group. Changing a user's Member Type can automatically update their security group membership, ensuring they have the appropriate access rights.
Internal Use Only:
Member Types can be set for internal use only, meaning they are not displayed on the frontend. This allows administrators to assign Member Types without user intervention, which can trigger specific topics and security settings without being visible to the user.
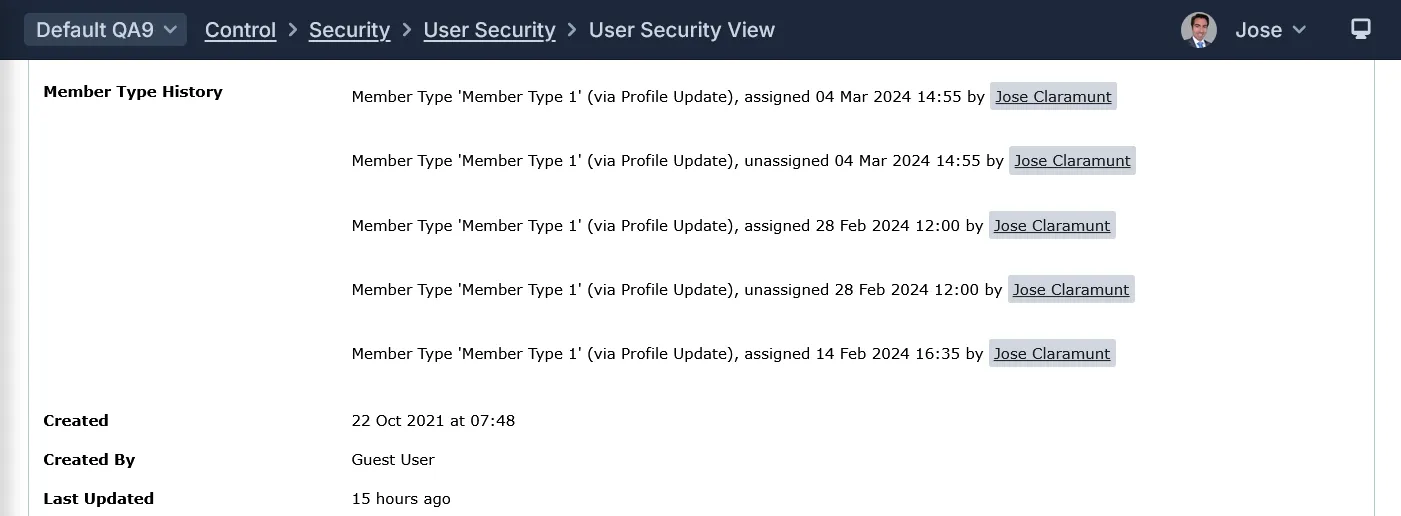
Audit Trails:
Changes to Member Types, such as assignments or updates, are tracked in the User Security screen of the individual user. This feature provides a history of changes, including when and how a Member Type was assigned or unassigned.
Setting up a Member Type:
In order to create a Member Type you need to set it up from the Member Types screen (Control > Security > Member Types).
Fields and Options:
- Name: Enter the Name you wish to call this Member Type, e.g. Artist; note that all entry fields with a tick next to them must be filled in
- Registration Profile: Select Registration Profile(s); Select more than one Item by using the [Ctrl] key
- Require User Approval: Tick this box to ensure that Users selecting this member type must be vetted by a Systems Administrator before they have access to this website
- Recruitment Sector Profile: Select the Recruitment Sector Profile appropriate to this member type. This will define many of the demographic details that the user has to enter in the Demographic Phase
- Topics: Select the topics you want to assign to this member type. These topics will then be used for the recommendations
- Hide Address: Select to Hide the Address fields that are selected on the Demographic Profile from the Demographic screen. This will allow the address to be captured or hidden based on Member Type
- Security Group: Select a Security group to associate with the User belonging to a Member Type. The Security Group is added to the User when they are added to a Member Type, but when the User is removed from the Member Type, they remain within the Security Group. i.e. it's a 1-way association
- Content Security Right: Select a Content Security Right to restrict this Member Type to be visible to
If you want to manually change the Member Type for a contact, you'll have to access the User Security screen and edit the users' member type from there.
Note: the change is done on the User Security screen, not the Contacts screen.
Another option is to use the User Import and set or amend the Member Type for each contact.
It is also worth noting that a user can change their Member Type on the "Update My Profile" page, which is accessed via the My Account screen on the front-end (aka display-side). So even if the Affino Admin sets their Member Type on the User Security screen (which is in the Control Centre), the user can manually update it themselves. Changing the Member Type in the Control Centre doesnt lock the Member Type option/function on the fron-end for the user.
Contact Lists and Mailing Lists
Contact Lists: Select the Contact Lists you want your users to be part of.
Mailing Lists: Select the mailing list you want to show on your registration page. If you are sharing this registration profile on multiple zones, you can use the Zone dropdown to define which zone you want to show the mailing list sign-up. If you want to show it across all zones, then you can select All.
Opt Out: Select to have Mailing Lists pre-ticked, where Users need to untick boxes to opt out of Mailing List.
Email Settings
Fields and options:
- Email Profile: elect the email profile that will used to receive registration notifications.
- Registration Notifications: elect the admin users who will receive the Registration Success notifications. If Double Confirm is enabled, this message will be sent after the user has Double Confirmed. Note: The Registration Success Message field must be selected.
- Registration Email Subject: nter the email subject sent to users when they have registered. E.g. Welcome to [_SiteName_]. Maintain the placeholder [_SiteName_].
- Registration Success Message: Enter the main registration welcome message that will be sent out to a user when approved for site access. Use the following placeholders [_User_], [_SiteName_], [_SiteURL_], [_Email_] and [_Password_Reset_Link_].
- Registration Rejected Email: Enter the message sent to user if their registration is rejected. Only required if Require Admin Approval is enabled.
- Pending User Message: Enter notification message to Security Administrator for when a user registers on the Website and requires approval. Dynamic variables: [_User_Detail_], [_SiteName_], [_Link_]
- Notification Banner: Select a Banner image you want to include at the top of all the Registration messages.
Double Confirm
Double Confirm is an additional verification step to ensure the authenticity of a user's registration. It helps to enhance security by requiring a second form of verification.
- Double Confirm: Select to enable Double Confirm. Do not use with eCommerce as the act of making a payment will authenticate the user.
- Send Double Confirm: After Registration or after Demographic. Select to send the Double Confirm email message after the Registration form or after the Demographic form. If Skip Demographic Form is selected, you will not be able to select the “After the Demographic” option.
- Activation Pending Period: Enter the number of days after the double confirm email is sent that the Post Activation Pending Action is undertaken IF the user does not Activate their membership.
- Post Activation Pending Period Action: Select option to be undertaken by the Activation Pending Period after the Activation Pending Action Days value has passed.
- Activation Action: Select action to be undertaken once a user activates their account.
- Double Confirm Activation Message: Enter the Double Confirm message shown on screen to notify users an activation email has been emailed to them.
- Double Confirm Human Verification Message: Enter the Double Confirm Human Verification message shown on screen to advise users to click on the human verification button. This is shown after they click on the link sent to their email inbox.
- Double Confirm Not Activated Message: Enter the Double Confirm message if a user tries to log in before confirming their email address.
- Double Confirm Email Subject: Enter email subject for double confirm email.
- Double Confirm Email Body: Enter the email body sent to users to validate their email addresses. Use the following placeholders [_Full_Activation_Link_], [_Email_], [_SiteName_], [_SiteURL_], [_User_]. The placeholder [_Full_Activation_Link_] is required as a minimum.
Note: it is best practice to have Double Confirm (the activation link in the notification) enabled. But if you wish to disable it, that is, to stop the activation email/notification from being sent, then leave the option unticked.
Advanced and Security
Advanced
- Design Script: Select a design script to apply to this registration profile
- Integration Script: Select the Integration Script used to generate a custom output or interaction when the Register/Submit button is clicked on the registration screen
Security
- Pending Timer: Select to enable Pending Period during which the user will be placed in the Default Security Group. Do not use in combination with Double Confirm Registration.
- Pending Auto Approval Delay: Enter the time in hours that the user is placed in the Default Security Group before being automatically placed in the Granted Security Group.
- End Of Trial Email Title: Enter title for End of trial email.
- End Of Trial Email Body: Enter Body for End of trial email. Maintain [_User_] placeholder
Text Items
- End Of Trial Email Body: Enter Body for End of trial email. Maintain [_User_] placeholder
Did you find this content useful?
Thank you for your input
Thank you for your feedback
Driving business at some of the world's most forward thinking companies


Our Chosen Charity
![]()
Meetings:
Google Meet and Zoom
Venue:
Soho House, Soho Works +
Registered Office:
55 Bathurst Mews
London, UK
W2 2SB
© Affino 2026