Contact Lists Guide

Contact Lists in Affino are dynamic groupings of contacts used for targeted communication, segmentation, and automation.
They integrate deeply with CRM, Permissions, Topics, Security Groups, and Conversion Events, enabling audience management.
Listing
Control > CRM > Contact Lists
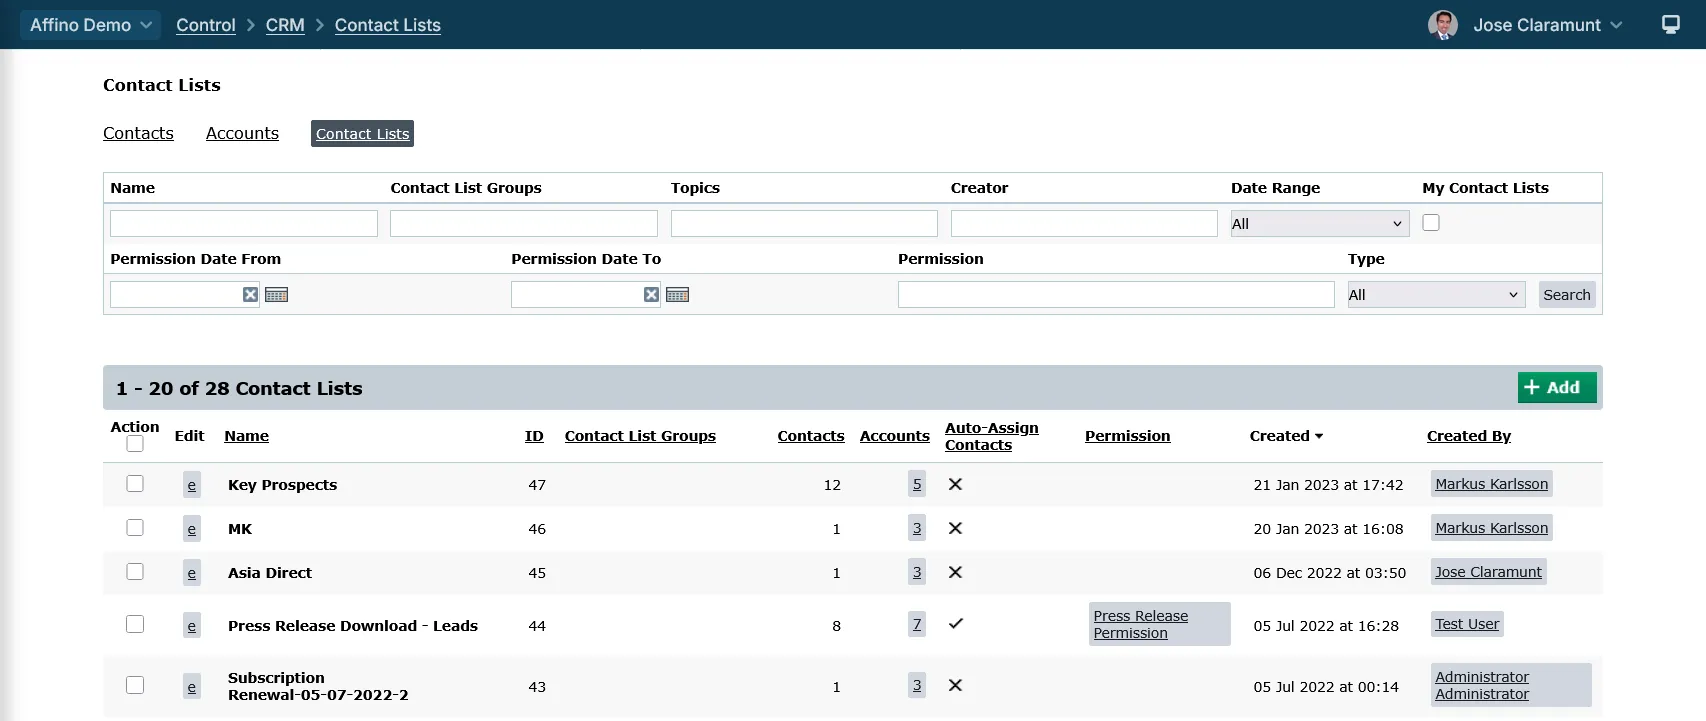
The listing screen for Contact Lists is where you first arrive when searching for a contact list.
Search Fields and Filters:
- Name:
- Contact List Groups
- Topics
- Creator
- Date Range
- My Contact Lists
- Permission Date From
- Permission Date To
- Permission
- Type
Columns:
- Action (Copy or Delete)
- Edit: click to directly edit the contact list
- Name
- ID
- Contact List Groups: link to the associated Contact List Group
- Contacts: the amount of contacts in the list
- Accounts: click the link to see the associated Accounts
- Auto-Assign Contacts: indicates if the contact list has Automatic Assignment enabled
- Permission: the associated Permission. Click to see the Permission.
- Created: the created date
- Created By: the user who created the contact list
Note: you can sort the result by clicking on the column name
Detail

Control > CRM > Contact Lists > Contact List
Buttons:
- add: click to add a new contact list
- edit: click to edit the contact list
- View Address List: click to open up a modal with the Address information of the contacts
- User Export: click to export the contacts in the list
Tabs:
Contacts: this displays a set of filters for searching contacts in the list
- Contact
- Account / Company
- Member Type
- Security Group
- CRM Topic
- Message Campaign
- Contact List
- Exclude Contact List
- Conversion Event
- My
- No Marketing
Accounts: this displays the accounts that are associated to the contacts in the list
- Status: dropdown with the following values (All, Interested, Not Interested, Deceased)
- Logo
- Name
- Account Code
- No. Contacts
- Next Task
- Last Note
- Last Touch
Tasks: this display the tasks that associated to the contacts in the list
- Add: adds a new task
- Edit: edits the task
- Contact: click on the avatar to see the contact
- Details: the details text of the Task
- For: link to the contact
- Assigned To: link to the contact
- Due
- Time
- No. of Updates
- Last Updated
- Last Updated By
Communication: this displays the Contact Notes, Message Opens and Message Sends for the contacts in the list
- Edit
- Contacts
- Details
- Created
- By
- Creator
- Last Updated
- By
- Updater
- Message
- Newsletter
- No
- Date
- Opened
Analysis: this displays Analysis figures, just like the ones on the Analysis tab for Contacts
- Badges
- Engagement
- Latest Activity
- All Conversion Events
- Assign Conversion Event
- Engagement Points by Type
Commerce: this displays eCommerce related data for those contacts
- Open Opportunities
- Closed Opportunities
- Orders
- Order Line Items
Add or Edit

Control > CRM > Contact Lists > Contact List Edit
Fields and Settings
Main Panel:
- Name: Enter a name to identify this contact list, e.g. Publishers
- Notes: Enter a description of the contact list, this is essential for future reference in the event that you have hundreds, potentially thousands of lists in operation
- Contact List Groups: Select the Contact List Groups to more easily manage contact lists
- Topics: Select one or more topics from your taxonomy to tag this list with. This will help you with identifying it in the future both directly and by filtering using topics when searching for a Contact List
- Columns: Select the columns that you wish to list out on the main Contacts listing. Note essential columns will always be included, including Name, Contact (details) and either the Actioned or Status column
Status Panel:
- Status: Create your custom status options, the top one will be the default option, e.g. New Lead or Contact, Review etc. and then you can have a further sequence of statuses. Allows you to intelligently manage and filter the list. Statuses cannot include commas.
- Delete Row: select to delete the row
- Add Row: click to add a new row
- Delete Selected: click to delete the selected row
Automatic Assignment Panel:
- Auto-Assign Contacts: Select to automatically assign Users to this Contact List based on AND / OR Topic criteria. Users are assigned or removed daily on a scheduled task. Note: If you change the Topic criteria midway, this could potentially change the Contact List substantially.
- Auto-Assignment Criteria: Select to auto assign contacts by Topics AND/OR Permission criteria. Choose "Topic OR Permission" or "Topic AND Permission"
- AND Topics: Select the topic criteria to add users to Contact List. Users that match the AND operator (e.g. Topic1 AND Topic2 AND Topic3) will be automatically added. Those that do not match this criteria will be automatically removed. You can combine this with the OR Topics, e.g. (Topic1 AND Topic2) OR Topic3
- OR Topics: Select the topic criteria to add users to Contact List. Users that match the OR operator (e.g. Topic1 OR Topic2 OR Topic3) will be automatically added. Those that do not match this criteria will be automatically removed. You can combine this with the AND Topics, e.g. (Topic1 OR Topic2) AND Topic3
- CRM AND Topics: Select the CRM Topic criteria to add users to Contact List. Users that match the AND operator (e.g. Topic1 AND Topic2 AND Topic3) will be automatically added. Those that do not match this criteria will be automatically removed. You can combine this with the OR Topics, e.g. (Topic1 AND Topic2) OR Topic3
- CRM OR Topics: Select the CRM Topic criteria to add users to Contact List. Users that match the OR operator (e.g. Topic1 OR Topic2 OR Topic3) will be automatically added. Those that do not match this criteria will be automatically removed. You can combine this with the AND Topics, e.g. (Topic1 OR Topic2) AND Topic3
- Permission: Select the permission statement from which to create this contact list. When a user agrees to a permission statement, they will be automatically added to this contact list.
Security Panel:
- Edit Control Security Right: Select to secure the management of this list to users who have the selected Content Security Right. Only these users will then be able to edit or delete this Contact List. Note that others can still add and remove contacts
- View Control Security Right: Select to secure the viewing of this list to users who have the selected Content Security Right. Only these users will then be able to view this Contact List
Logic for AND/OR
Example
If you select:
- Auto-Assignment Criteria: Topic OR Permission
- OR Topics: Topic1
- Permission: 'Test Permission'
-- that means "select contacts which have the 'Topic1' topic OR the 'Test Permission' permissions.
And if you select:
- Auto-Assignment Criteria: Topic AND Permission
- AND Topics: Topic1 + Topic2
- Permission: 'Test Permission'
-- that means "select contacts which have the 'Topic1' and 'Topic2' topic AND the 'Test Permission' permission.
Essentially:
- Topic1 AND Topic2 (the user will be assigned only if they have both topics)
- Topic1 OR Topic2 (the user will be assigned if they have either topics)
- If you only select one topic, both conditions are met, i.e. the user has Topic1 AND "", the user also has Topic1 OR ""
- The Topic OR/AND Permission is another level on top which checks whether the user also has a permission set
Note: The labels are AND Topics, OR Topics meaning plural
Did you find this content useful?
Thank you for your input
Thank you for your feedback
Driving business at some of the world's most forward thinking companies


Our Chosen Charity
![]()
Meetings:
Google Meet and Zoom
Venue:
Soho House, Soho Works +
Registered Office:
55 Bathurst Mews
London, UK
W2 2SB
© Affino 2026