Accounts Guide

Links to Accounts and Listing
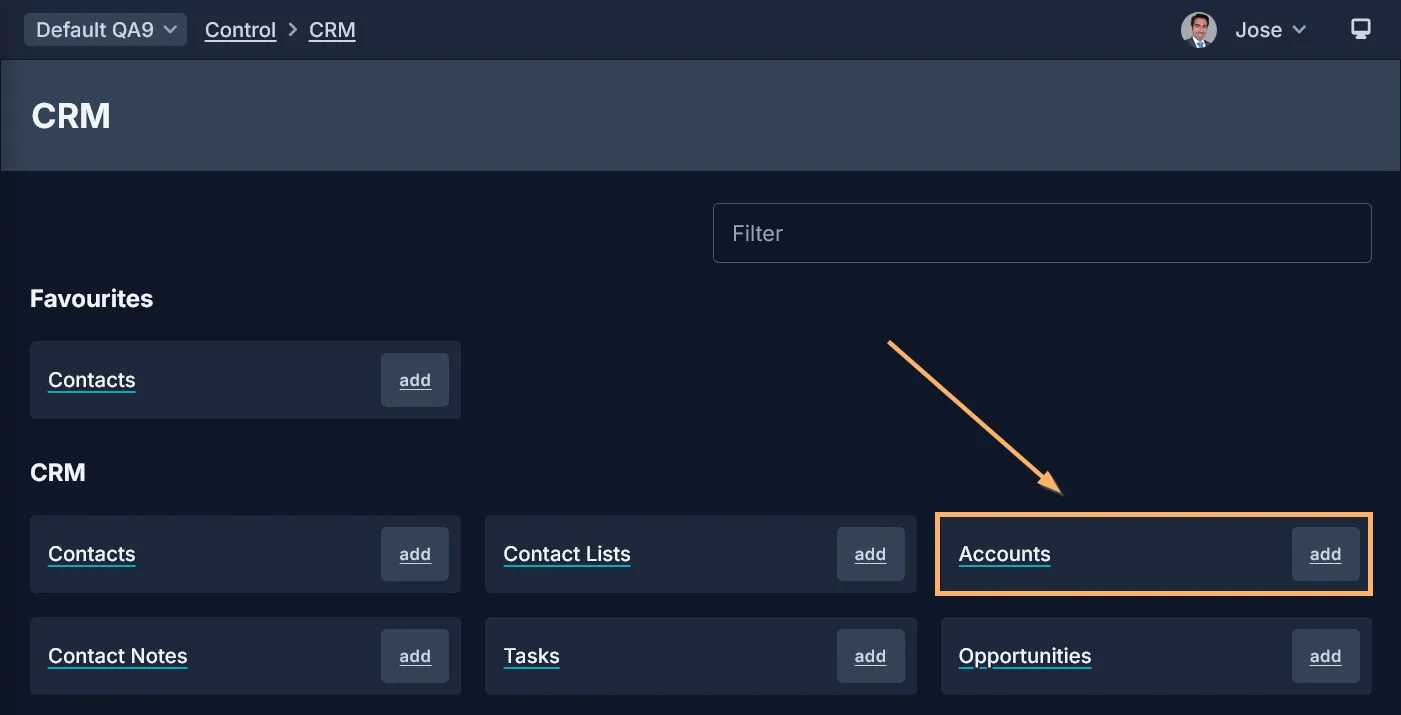
Link to Accounts:
Accounts can be found on the ’CRM’ screen:
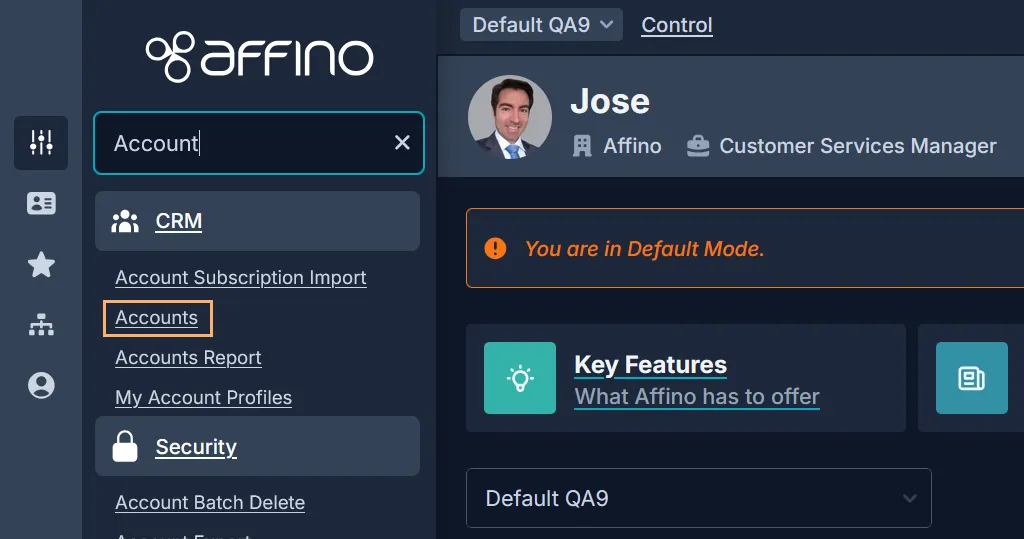
You can also access the Accounts listing screen from the Control Centre side menu:
Account Listing:
The Accounts listing screen is a comprehensive interface designed to manage and filter accounts effectively.
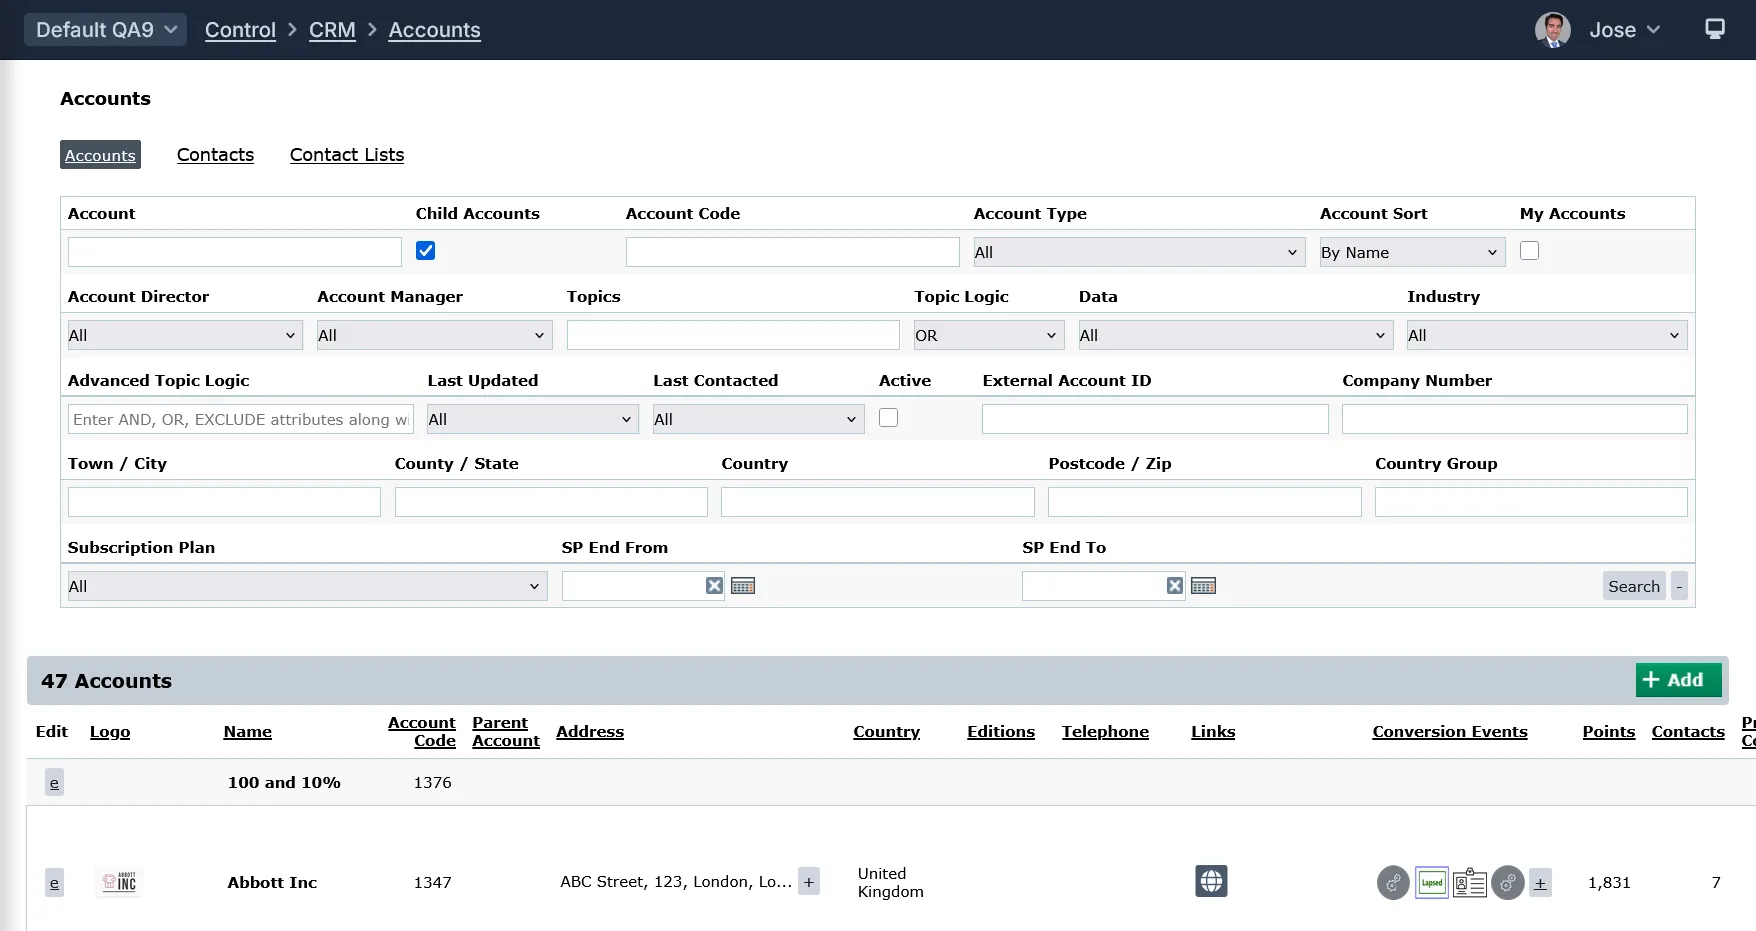
Here is a detailed breakdown of all the links, options, settings, search fields, drop-down fields, and text fields that are available, along with their purposes:
Top Links:
- Accounts: link to the Accounts listing
- Contacts: link to the Contacts listing
- Contact Lists: link to the Contact Lists listing
Filters:
- Account (Text field): Allows searching by account name.
- Child Accounts (Checkbox): When selected, the search includes child accounts in the results.
- Account Code (Text field): Filter accounts by their unique account code. Supports comma-separated values for multiple codes.
- Account Type (Dropdown): Filter accounts by their type (i.e. Analyst, Competitor, Customer, etc).
- Account Sort: (Dropdown): sort results by Name, Turnover, Size and Created date.
- My Accounts (Checkbox): filter by Accounts created by you.
- Account Director (Dropdown): filter search results by the assigned Account Director.
- Account Manager (Dropdown): Filter accounts by the assigned Account Manager.
- Topics (Multi-topic selector): Filter accounts by associated topics.
- Topic Logic (Dropdown): search by AND/OR logic for topics assigned to an Account.
- Data (Dropdown): filter accounts that have incomplete or missing information (i.e. No Email). This facilitates data cleanup or enrichment efforts.
- Industry (Dropdown): filter Accounts by their Industry
- Advanced Topic Logic: (Text): this filter allows users to apply complex, precise filtering of accounts based on topics. Unlike the simpler "Topic Logic" filter, which lets users select between basic AND/OR logic for combining multiple topics, the "Advanced Topic Logic" enables users to enter a detailed logical expression using AND, OR, and EXCLUDE operators along with parentheses to group conditions.
- Last Updated (Relative/Dynamic Date Range Filter): Filter accounts that were updated within the available range (7 Days, 30 Days, 90 Days, etc).
- Last Contacted: (Relative/Dynamic Date Range Filter): Filter accounts that were last contacted within the available range (7 Days, 30 Days, 90 Days, etc).
- Active (Checkbox or selector): Filter accounts based on active status.
- External Account ID (Text): Filter by external system account identifiers.
- Company Number (Text): Filter by company registration number.
- Town / City (Text field): Filter accounts by location City.
- County / State (Text): Filter accounts by County or State.
- Country (selector): Filter accounts by country.
- Postcode / Zip (Text): Filter accounts by postal code.
- Country Group (selector): Filter accounts by grouped countries.
- Subscription Plan (Dropdown): Filter accounts by their subscription plans.
- Subscription End From End To (Date Range Picker): Filter accounts by subscription Start/End dates.
Listing Panel Columns:
- Logo: Displays the company logo if available. Logos are sized to not exceed 80px in width or height.
- Name: Account name, clickable to open the account detail.
- Account Code: Unique code for the account.
- Parent Account: Shows the parent account if applicable.
- Address: Displays the account's address.
- Country: Shows the country of the account.
- Editions: Lists editions associated with the account.
- Telephone: Displays the telephone number.
- Links : Contains icons/links for Website, Twitter, Facebook, LinkedIn, Email, Google, and Map. These are displayed as icons for better usability.
- Conversion Events: Shows conversion event data related to the account.
- Points: Total points accumulated from conversion events for the account's contacts.
- Contacts: Number of contacts associated with the account.
Primary Contact: Displays the primary contact person, clickable to their profile.
Account Management: Currently blank; may be removed.
Account Type: Shows the type of account. - Opps: this is an optional column that displays the number of open Ppportunities associated with each account. It is an abbreviation for "Opportunities" to save space on the listing.
- Last Touch: Date of the last interaction or conversion event.
- Created: Date the account was created.
- Edit ("E" link or button): clickin on the "E" opens the account edit screen.
Note: the default sort order for the listing is by Name (alphabetical).
Additional Notes and Features:
- Clicking on the Add button opens the Account add/edit screen
- The filter panel can be collapsed or expanded, with a "+" button to show more filters, similar to the Contacts filter panel.
- The listing supports sorting on sortable columns.
- There are options to show or hide certain columns like Telephone, Primary Contact, Account Management, and Account Type via the CRM Settings screen.
Viewing Accounts
The Account detail/view screen is designed to provide a comprehensive, read-only overview of an individual Account's information, organized into panels and tabs for clarity and ease of use.
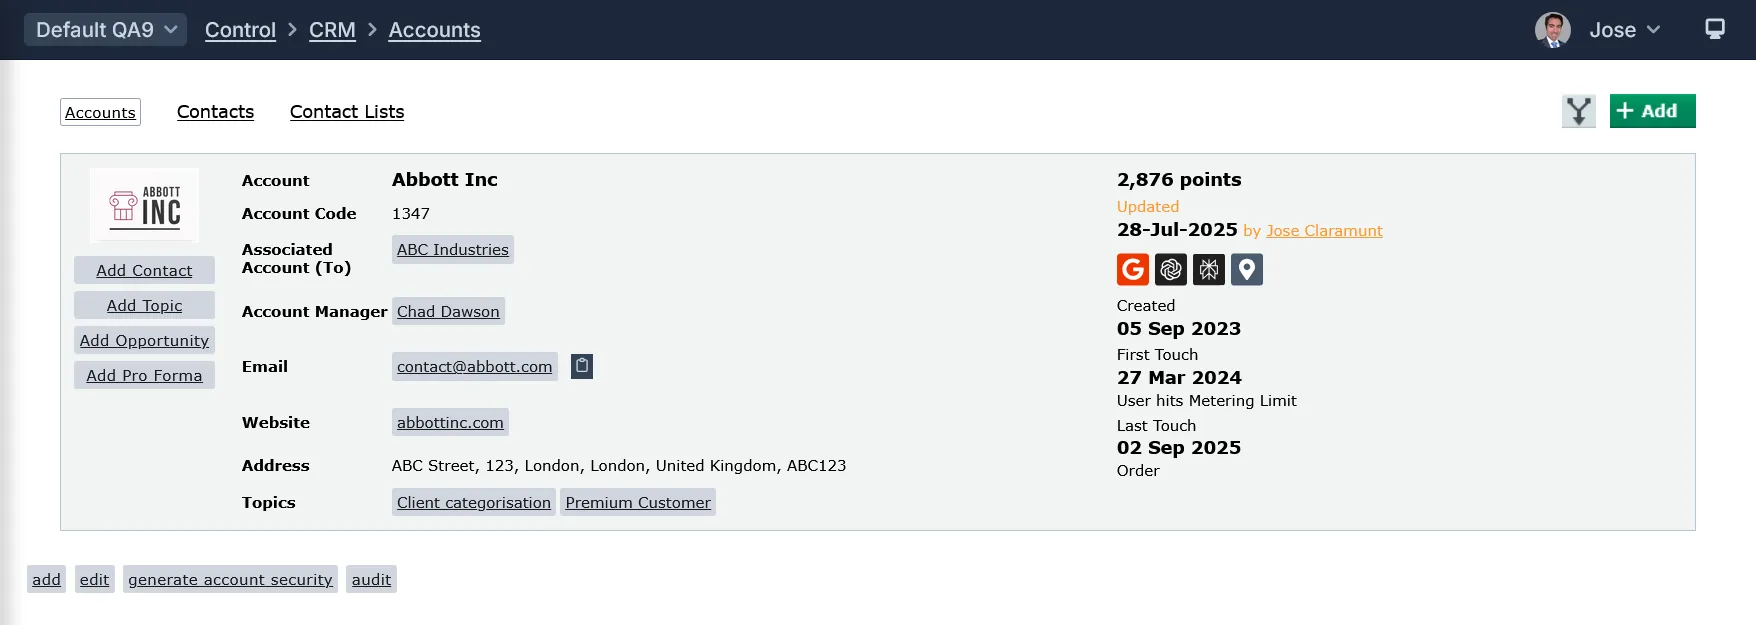
Below is a detailed breakdown of the fields, buttons, tabs, options, settings, and panels that appear on this screen, along with their purposes.
Top Links and Buttons:
- Accounts: link to the Accounts listing
- Contacts: link to the Contacts listing
- Contact Lists: link to the Contact Lists listing
- Merge button: this is used to combine duplicate or related account records into a single, unified account. This process consolidates all associated data from the source account into the target account, ensuring that no important information is lost and avoiding duplication within the system.
- Add Button: clicking on this button will present the Add/Edit screen for creating a new Account
Header and Top Bar (fields and buttons):
- Account Logo: the logo of the Account (similar to the Contact avatar)
- Add Contact button: Opens a new tab to add a contact with the Account pre-filled.
- New Opportunity button: Opens a new opportunity tab with the Account pre-filled.
- New Pro Forma button: Opens a new pro forma tab with the Account pre-filled.
- Account Name Heading: the name of the Account
- Accound Code: the code of the Account
- Associated Account (To): this link serves to display the account(s) that the current account is associated with in a directional manner. Specifically, it shows the accounts to which this account is linked or associated.
- Account Manager (link): the manage of the Account
- Email (link): clicking on the link makes your default email app open to send an email to that address. You can also copy the email address using the copy button that is beside the link.
- Website: the Account's website
- Address: the address of the Account
- Topics: the topics assigned to the Account
- Total Points: Shows the total points accumulated by contacts on the Account.
- Updated: the last updated date for the Account
- Created: the date the Account was created
- First Touch: the date when a contact, which is assigned to the Account, triggers a Conversion Event or performs an actions, such as making a purchase (thus generating an order)
- Last Touch: similar to First Touch, although this field takes into account the date that the last action made by an associated contact
- add (button): this present the Add screen for creating a new Account
- edit (button): this takes you to the Edit screen for the Account
- generate account security (button): this is used to initiate the process of generating security credentials or codes related to the Account
- audit (link): this takes you to the Audit screen and present results related to the Account
Tabs
The Account screen has several tabs. Each serve distinct purposes to provide a comprehensive view and management of the account.

Here is a detailed explanation of each tab and its purpose.
Details:
This tab provides the core information about the Account, including key fields such as Account Type, Account Manager, Primary Contact, Account Code, Parent Account, Address, Telephone, Website, and Social Media links. It also includes panels for Subscription Plans and Event Credits if applicable. The Details tab is the main overview of the account’s profile and essential data.
Contacts:
Lists all contacts associated with the Account and its child accounts. You can associate existing contacts to the account by means of the "Associate with Contacts" function, which is set as a button on the left hand side. You can also add a contact, which will be automatically assigned to the account, by means of the Add button, which is located to the right hand side.
Tasks:
This tab is dedicated to managing tasks related to the Account. Tasks are displayed with full details, including the ability to expand task descriptions inline. The tab allows users to view, add, and manage open and closed tasks associated with the account.
Communication:
Displays communication history and notes related to the Account. This includes Contact Notes, Most Recent Form Entries, Most Recent AI Questions, Latest Threads and other logged interactions. It supports adding new notes and reviewing past communications to maintain a clear record of engagement.
Content:
Shows content (articles) which is associated to the Account. Columns include Title, Section, Presentation Style, Live status, Created By, Publish Start date, and Views. This tab helps track content related to the Account.
Commerce:
Focuses on commercial activities linked to the Account, such as orders, invoices, opportunities, and spend. It provides insights into the financial and sales interactions with the Account, supporting sales and revenue tracking.
Digital Assets:
This tab shows subscriptions where the subscriber/contact belongs to the Account. Subscriptions assigned to users who have left the Account are filtered out from the Account's Digital Assets tab, although all subscriptions remain visible on the individual contact's Digital Assets tab.
Projects:
Lists projects related to the Account, allowing users to track ongoing and completed projects. This tab supports project management by associating projects directly with the Account for easy reference.
Events:
Displays events connected to the Account, including attendance, participation roles (attendees, speakers), Award Entries and Award Judges. It helps monitor the Account’s involvement in seminars, conferences, and other events.
Client Campaigns:
Shows Client Campaigns created for the Account. It lists campaigns with details such as campaign name, code, description, product line, start and end dates, live status, and links to Client Campaign dashboards.
Engagement Report:
Provides a comprehensive report on the Account’s engagement metrics over selected timeframes. It includes data points like total members, engaged members, points, logins, top users, authored articles, recent logins, display views, areas accessed, engagement points, top interests, events, messages, and subscriptions. The report is generated dynamically and can be reviewed to assess the Account’s activity and engagement.
User Analysis:
Offers detailed analysis of user interactions with the Account, including page views, recent views, referring URLs, and other statistics. It helps understand how users engage with the Account’s content and presence, supporting data-driven decision-making.
Panels: Main and Account Address
Main Panel
The Main panel serves as the primary area displaying key and essential information about the Account. It consolidates the most important account details in one place for quick reference and management.
Fields:
- Name: Enter Account's name
- Screen Name: Enter a unique Screen Name for the Account - this should be SEO friendly.
- Contacted: Select if this Account has been contacted.
- Notes: Enter in useful information you want to keep with this account record.
- Topics: Select the key terms which match this account.
- Logo: Select the Account logo. This will be presented as appropriate and used in correspondence with regards to this account.
- Account Type: Select the Account Type for the account
- Parent Account: Select the Parent for this account
- Child Accounts: Select the accounts which are child accounts for this account.
- Associated Accounts: Select Associated Accounts. This can be used to relate other Accounts as brands that not necessarily has a Parent/Child relationship. This will be reflected on the Public Account page under the
- Overview tab. This will be sort listed as alphabetical and the top 6 accounts will be shown first and users have the option to view all.
- Account Contacts: Select all the account contacts. This is essential to surface the contacts, their tasks, orders, subscriptions analytics and much more. Also essential for main Account for assigning Tasks and Contact Notes to team members.
- Primary Contacts: Select the primary contact for the account.
- Marketing Contacts: Select the marketing contacts for this Account.
- Invoice Contacts: Select the default invoicing contact for the Account. When selected this will populate the Contract Invoice Contact fields with the name and email address of this contact.
- Account Forum: Select the Forum related to this account.
- External Account ID: This can be used to store any external Account Id reference e.g. for Sage.
- Company Number: This is the UK Companies House number.
- Tax Exempt: Select this if the Account is exempt from paying tax in your country (for example, International Accounts).
- VAT Number: If the Client is registered for VAT then their number is stored here. This is also displayed on the Customer Invoice.
- Telephone: Enter the contact Telephone number
- Best Time To Call: Enter the best time to call the account.
- Fax: Enter the Fax number
- Email: Enter in the corporate email address.
- Website: Account DirectorSelect the Account Director for the account
- Account Manager: Select the Account Manager for the account
- Account Team: Select the Account Team Members. These will be default selected for any notifications.
- Industry: Select the main Industry for the account
- Size (Number Of Staff): Enter the size of company (number of staff). This can be an alphanumeric value.
- Annual Turnover: Enter the annual company turnover. This can be an alphanumeric value.
- Ownership: Select the company ownership structure
- Active: Tick this box to make this Account Active
Address Panel
The Account Address panel screen serves to display the main address details of the Account separately from other key information. It is positioned below the Main panel and is dedicated specifically to the full address information for clarity and better organization.
Fields
- Address 1: Enter first line of Address
- Address 2: Enter second line of Address
- Address 3: Enter in any additional address information.
- Town / City: Enter the Town or City
- County / State: Enter the County or Region.
- Postcode / Zip: Enter the PostCode or Zip
- Country: Select the Country
Panels: Social Media and Public Information
Social Media Panel
The Social Media panel serves as a dedicated section to manage and display the account's social media links. This panel is positioned after the Account Address panel and was introduced to improve the organization and usability of social media information within the account details.
Fields:
- LinkedIn Page: Enter in the account's LinkedIn URL. Note this will be displayed on the Public page if this account is made public.
- Facebook Page: Enter in the account's Facebook URL. Note this will be displayed on the Public page if this account is made public.
- X ID: Enter your account ID for X. Note this will be displayed on the Public page if this account is made public.
Public Information Panel
The Public Information panel serves as a dedicated section for managing and displaying information intended for public-facing account listings. It includes fields that help present the account in a public context, such as:
- Public: Select to allow this Account to be listed publicly on the Account Listing and Search channels.
- Public Name: Set a Public Name for the Account. It will be shown on the Display side when listing out account information, e.g. on Recruitment Briefs.
- Priority: Select the priority for this Account, when selected, and depending on the default sort set on the listing, this Account will be listed based on the priority selected.
- Teaser: Enter the teaser information for this Account, displayed on the Account channel listing.
- Description: Enter a description for this Account. This is used on the Member Accounts channel.
- Sponsored Account: Select to highlight this account on the Accounts Listing channel.
- Message Account: Select to show a Message Account button on the Account Detail page. If this Account is a Child Account, then the Message Account button will also show under the Offices tab. Please note, if you have Show Message Account (All) selected on the Account Profile, then that will apply across all Accounts, despite if you have this setting selected or not.
- Hide From Site Search: Select to hide this Account from Site Search.
- Hide Logo: Select to hide the Logo from the Account detail and listing screens, including on the Offices tab if this account is a child account.
- Hide Telephone: Select to hide the Telephone from the Account screen, including on the Offices tab if this account is a child account.
Hide Email: Select to hide the Email from the Account screen, including on the Offices tab if this account is a child account. - Hide Website: Select to hide the Website from the Account screen, including on the Offices tab if this account is a child account.
- Hide Social Icons: Select to hide the Social Icons from the Account screen, including on the Offices tab if this account is a child account.
- Hide Overview Tab: Select to hide the Overview tab from the Account screen.
- Hide Offices Tab: Select to hide the Offices tab from the Account screen.
- Hide Contacts Tab: Select to hide the Contacts tab from the Account screen.
- Hide Articles Tab: Select to hide the Articles tab from the Account screen.
- Hide Product Tab: Select to hide the Product tab from the Account screen.
- Hide Video Tab: Select to hide the Video tab from the Account screen.
- Hide Audio Tab: Select to hide the Audio tab from the Account screen.
- Hide Directory Tab: Select to hide the Directory tab from the Account screen.
- Hide Link Tab: Select to hide the Link tab from the Account screen.
- Hide Associated Accounts Tab: Select to hide the Associated Accounts tab from the Account screen.
- Link To Account Detail From Offices Tab: Select to link to the Account Detail screen from the Offices tab, if this account is a child account.
- Featured Link Label: Enter a label for a featured link tab to be displayed on the Account.
- Featured Link URL: Enter a custom link for this Account. This will create a new tab on the Account linking to this custom URL.
- Open Featured Link In New Tab: Select to open the Featured Link in a new browser tab.
- Featured Contacts: Select the Contacts to be featured on the Accounts channel, Overview tab, filter this list by those that are selected on Contacts field.
- Featured Articles: Select the articles to be shown on the Featured Articles tab for this Account.
- Featured Images: Select the images to be shown on the Featured Images tab for this Account.
- Featured Documents: Select the documents to be shown on the Featured Documents tab for this Account.
Panels: Subscriptions
Subscription Related Panels
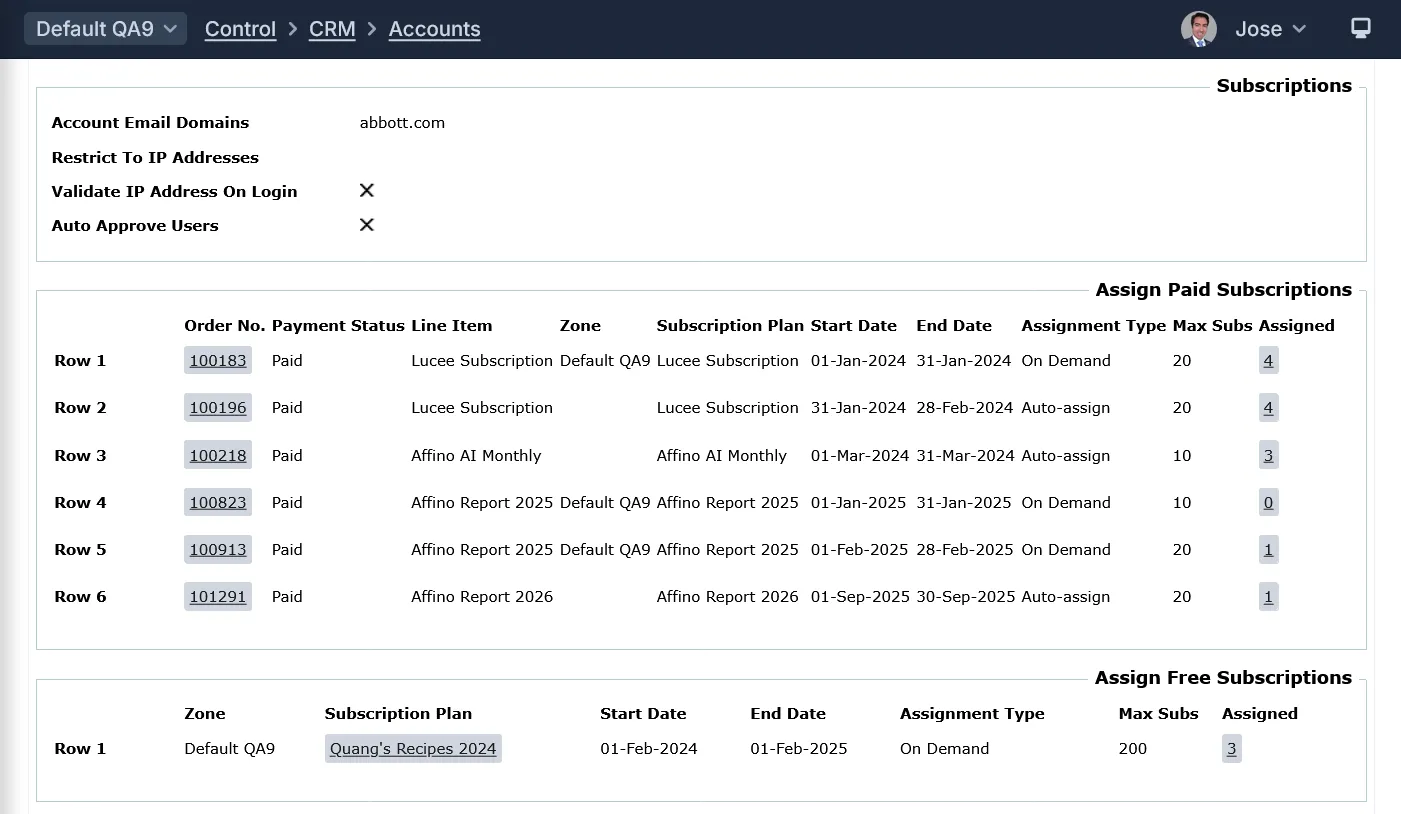
Subscriptions:
The Subscriptions panel is a key area for managing the account's subscription plans and related subscription details.
Fields:
- Account Email Domains: Enter in a comma separated list of email domains, i.e. the part after the @ sign, for this account. This will be used in to assign users to this account and ultimately to also auto assign subscriptions if applicable. Note that users with matching emails for these domains will be sent a double-confirm email to confirm their ownership of the email address they are registering with, whether it is enabled on the Registration Profile or not. Once a user is associated with an account with a matching email domain then they can't change their email address from the account, this can only be done by an administrator. Also note that users are not affect by the Restrict To IP Addresses in this scenario, so they can register from any IP address / IP Range. Note: Affino will associate a user to the Account, even if no space or spaces are used between email domains
- Restrict To IP Addresses: Enter a space separated list of IP Addresses or IP Range to restrict registration and subscription assignment (if applicable) from these IP Addresses, this will prevent registration to those located remotely or from different IP Addresses. Note that users matching an Account Email Domain will not be restricted to be located within these IP Addresses / Range
- Validate IP Address On Login: Select to enforce logging in via authorised IP Addresses. set in the Restrict To IP Addresses field. Subscriptions will also be assigned if they don't already have the subscription access, i.e. they were previously registered before the auto subscription assignment was enabled
- Auto Approve Users: Select to automatically approve the user if 'Require User Approval' is selected on Registration Profile or Member Type(s). This will upgrade the user to the Granted Security Clearance, add security group from Member Type, send the approval notification email, removes them from Pending Users and trigger Added to Security Group conversion events
Assign Paid Subscriptions Panel:
The Assign Paid Subscriptions panel is designed to manage the assignment of paid subscription plans to contacts associated with that account. It provides a detailed interface where administrators can:
- View paid subscription orders linked to the account, including order numbers, subscription plans, start and end dates, maximum subscribers allowed, and the number of subscriptions currently assigned.
- Manually assign or unassign paid subscriptions to contacts within the account.
- See the payment status of each subscription line item, which helps in managing unpaid subscriptions by displaying their status next to the order number.
- Select the assignment type for each subscription line item, choosing between "On Demand" (assign when a contact logs in or registers) or "Auto-assign" (assign all valid contacts on the subscription start date).
- Use a zone selector if multiple active zones exist, allowing subscriptions to be assigned within specific zones.
- Add or delete rows representing subscription assignments, facilitating flexible management of subscription allocations.
- Track assigned subscriptions versus the maximum allowed, ensuring subscription limits are respected.
Fields:
- Order No.: the order number associated to the purchase
- Payment Status: the current payment status of the purchase
- Line Item: the catalogue item associated to the purchase
- Zone: select the appropriae zone if you have a multi-zone setup
- Subscription Plan: the subscription plan associated to the purchase
- Start Date: the subscription Start Date
- End Date: the subscription End Date
- Assignment Type: choose to have the subscriptions assigned as On-Demand or Auto-Assign
- Max Subs: the maximum amount of subscriptions available for the accounts' contacts
- Assigned: the amount of subscription already assigned to contacts
Assign Free Subscriptions Panel
The Assign Free Subscriptions panel is designed to manage the allocation of free subscription plans to contacts associated with that account. Its purpose includes:
- Allowing administrators to add rows representing free subscription assignments to the account, specifying subscription plans that grant free access to users linked to the account.
- Supporting a zone selector dropdown if multiple active zones exist, enabling subscriptions to be assigned within specific zones. If no zone is selected, the subscription plan applies to all zones.
- Enabling the updating of subscription start and end dates at the account level, with the system automatically updating existing subscribers' subscription dates to match any changes made on the account. This ensures consistency across all assigned free subscriptions.
- Facilitating the assignment of free subscriptions to active users who are associated with the account, typically based on criteria such as email domain or IP address restrictions.
- Integrating with scheduled tasks that auto-assign subscriptions on their start dates, supporting both immediate and future-dated assignments.
- Providing visibility into the number of assigned subscriptions versus the maximum allowed, helping to manage subscription limits effectively.
Fields:
- Zone
- Subscription Plan
- Start Date
- End Date
- Assignment Type: Select whether to assign the subscription On Demand, i.e. when an account-based contact logs in (or registers) or Auto-assign, i.e. all valid account-based contacts on the subscription start date are auto-assigned available subscriptions.
- Max Subs
- Assigned
- Delete Row
Event Credits Panel
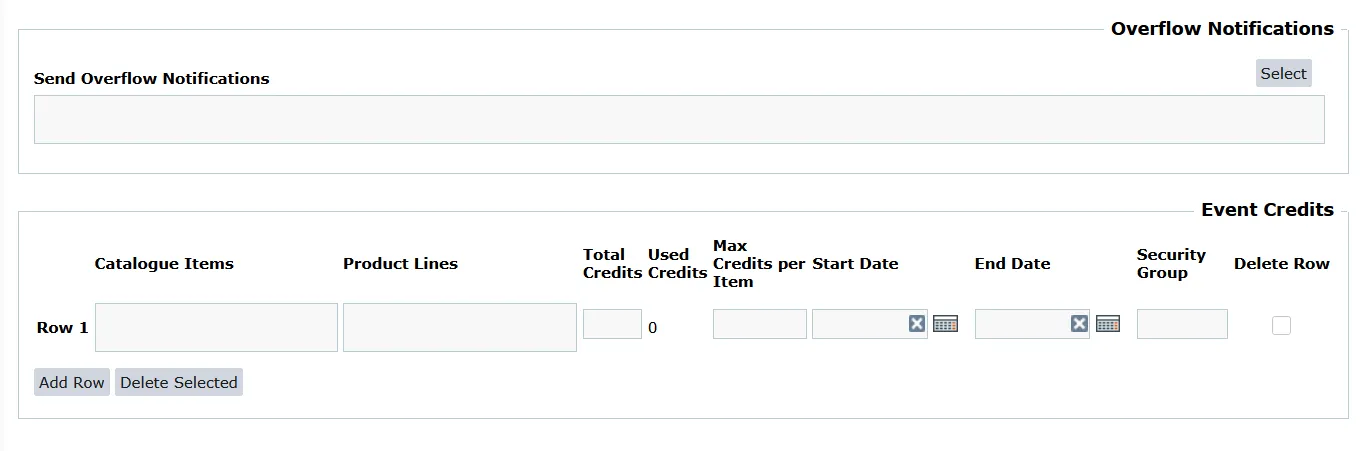
The Event Credits panel serves as a management interface for site administrators to allocate and oversee Event Credits assigned to an Account. These Event Credits allow contacts within the Account to book events using the credits available to them, effectively enabling event attendance without direct payment for each event.
Note: Catalogue Item and Product Line are requiered fields, you can only select either one or the other.
- Catalogue Items: the catalogue item that the event credits can be applied to
- Product Lines: the product lines that the event credits can be applied to
- Total Credits: enter the total number of credits allocated to this account for the selected Catalogue Items or Product Lines
- Used Credits: the amount of credits used by the account
- Max Credits per Catalogue Item: enter the number of times users are allowed to book per Catalogue Items
- Start Date: Event credits are valid from this date
- End Date: Event credits are valid until this date
- Security Group: Event credits are only valid for users in the selected Security Group
- Delete Row
Accounts and CRM Settings
CRM Settings and its relation to Accounts
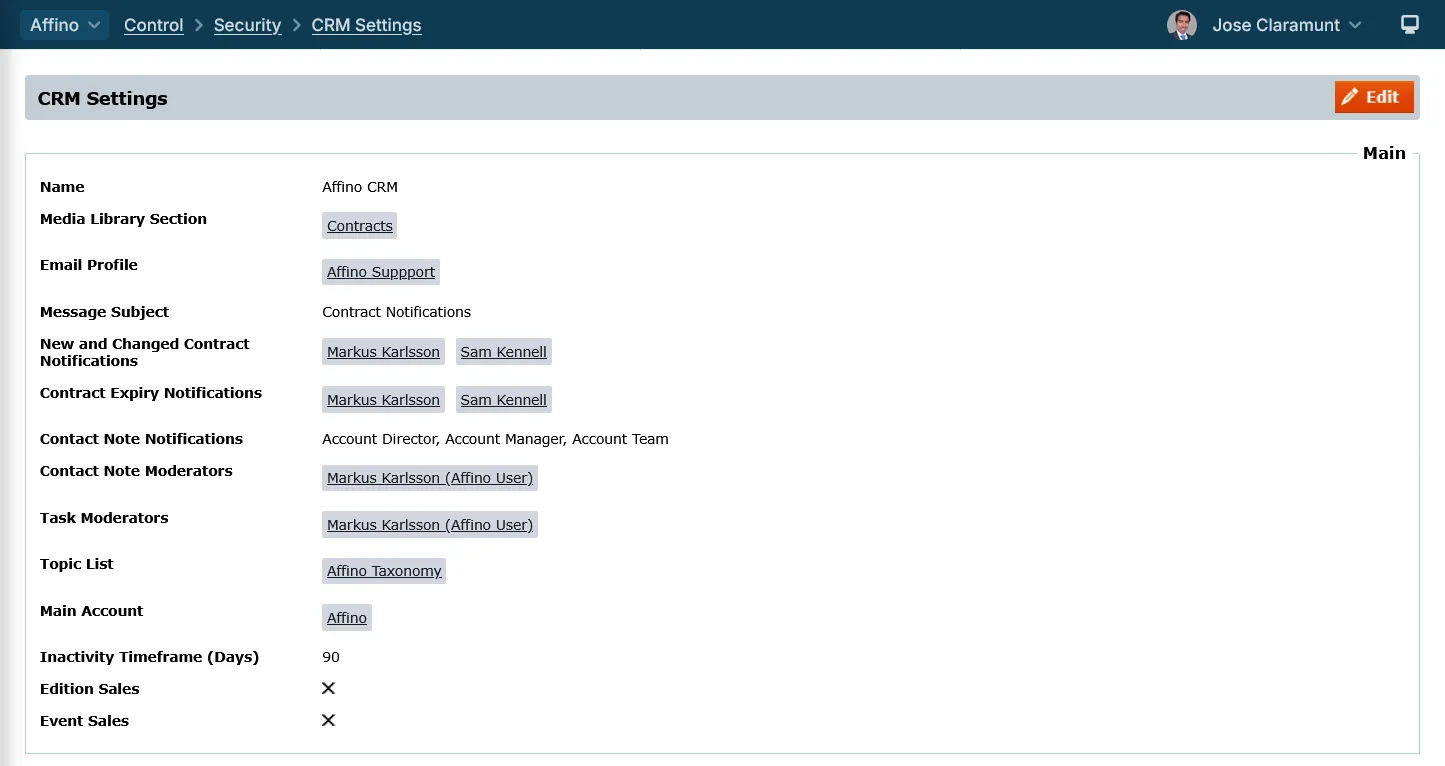
Control > Security > CRM Settings
The CRM Settings screen in Affino is closely related to Accounts in several important ways, primarily by controlling how account information is displayed, managed, and interacted with across the system.
Here is a detailed explanation of their relationship:
Central Configuration for Account Display and Behavior
The CRM Settings screen acts as the central place where administrators configure key attributes and display options for Accounts. This includes enabling or disabling specific columns and panels on the Accounts listing and detail screens, such as showing telephone numbers, primary contacts, account types, logos, points, and social media links.
Control Over Account Listing Columns and Filters
CRM Settings allow toggling visibility of various columns in the Accounts listing, such as:
- Show Telephone Contact
- Show Primary Contact
- Show Account Management
- Show Account Type
- Show Topics (formerly Tags)
- Show Links (website, social media icons)
- Show Logo and Points (with sorting capabilities)
These settings directly affect what users see when they view or filter Accounts in the Control Centre.
Customization of Account Tabs and Panels
CRM Settings include options to show or hide entire panels on the Account detail screens, such as:
- Public Information Panel
- Subscription Panels
- Event Credits Panel
Task and Note Display Controls
CRM Settings provide toggles to display "Next Task" and "Last Note Date" columns on both Accounts and Contacts listings and detail views. This enhances workflow visibility directly from the Accounts interface.
Topic and Keyword Management
The CRM Settings govern how Topics (formerly CRM Topics and Keywords) are handled and displayed on Accounts. This includes:
- Showing Topics column on Account listings
- Enforcing use of a unified taxonomy for Topics across zones
- Renaming and consolidating Tags to Topics for consistency
Account Engagement and Reporting Defaults
CRM Settings include configuration for the Accounts Report and Account Engagement Report, allowing default filters, columns, and sorting to be set. This impacts how engagement metrics and reports are generated and viewed for Accounts.
Social Media and Link Display
CRM Settings control the display of social media and website links on Accounts, replacing text links with icons for better usability and consistency. This applies to both listing and detail screens.
Simplification and Panel Visibility Options
CRM Settings allow the hiding of Public, Subscription, and Event panels on Accounts to simplify the interface for users who do not use those features. Social media links are moved accordingly to maintain accessibility.
Integration with Account Profiles and Listing Behavior
CRM Settings work alongside Account Profiles, which define listing and detail tab sort orders, filters, and scoped topic filters. Together, they determine how Accounts are presented and filtered in the system.
Please refer to the CRM Settings guide for more information.
Did you find this content useful?
Thank you for your input
Thank you for your feedback
Driving business at some of the world's most forward thinking companies


Our Chosen Charity
![]()
Meetings:
Google Meet and Zoom
Venue:
Soho House, Soho Works +
Registered Office:
55 Bathurst Mews
London, UK
W2 2SB
© Affino 2026