 Customer Support
 Contact Sales

 About
About


Self Service Directory Guide
Overview
Directories allow your Clients to showcase their content, each displaying an overview, together with the associated documents and images.
Apart from their own Directory, Clients can upload and showcase their goods by means of Directory Articles.
This guide will show you how to set up these profiles so that your Clients can manage their directory and directory articles on the display side within the set presentation styles and limitations.
Quick Start
Self-service directories let contacts add and maintain their own listings without operator intervention. Common for partner directories, member listings, and service-provider catalogues where the operator can't curate every entry.
The minimum setup:
- Configure the underlying Directory Profile with the listing schema (see Directory Setup Guide).
- Enable self-service on the Directory Profile - this exposes the listing form to authenticated contacts.
- Define the approval workflow - auto-approve, moderator review, or manager review.
- Surface the "Add a listing" entry point in member-facing navigation.
Once configured, contacts see Save as Draft and Submit buttons on their listings; operators see a moderation queue if review is required.
The Directory Listing
The Directory Listing shows all of the directories that are available on your website.
Search directories using text or topics (the directories are tagged with ad-hoc topics).
Directory Templates: Simple and Advanced
Simple Directory:
The Simple directory template can contain steps (videos, images, documents) and a link to their articles.
If there’s a Comment And Rating Profile added to the channel, users will be able to add a comment on the directory via the ‘Add New Comment’ field.
Note: the Simple Directory does not include tabs (which are generated based on the Category Topic selected on the individual article).
Advanced Directory:
The Advanced Directory is focused on being an agency, which uploads different types of content, such as news, press releases and media.
Contrary to the Simple Directory, the Advanced Directory has an added element: tabs.
These are generated based on the directory articles' category topic.
If an article is tagged with the “News” category topic a News tab will be shown on the directory.
Directory Article Templates: Product and Article
Directory Product Template
This template uses 2 columns.
This template includes the related Directory entry and is not as wide as the Advanced template.
With this template, you can show a special offer text within a date range.
Directory Article Template
This is a 1 column template.
It does not have the related Directory entry on the right hand side, but you can add this using the manually related Design Element.
The main image, video player, text, etc is wider on this template.
Directory and Directory Articles setup
The setup is broken down into 2 parts:
- First create the main Directory Channel, configure the Directory Profile and Directory Step Profile to allow clients to update their company information and add media items.
- Optionally, set up the Directory Articles Channel and configure the Directory Articles Profile to allow clients to create articles within their own directory.
Please refer to the following guides: Directory Setup Guide and Directory Articles Setup Guide.
The rest of this guide details how to set up an approval process via a Workflow Profile to the specified Directory channel.
Content Publishing Workflow
If you wish for your Clients to create their own directories and/or directory articles, and have them go through an approval process, you can do so by adding a Workflow Profile to the specified Directory channel.
A Workflow Profile allows you to configure settings for content creation and publication. It includes options for hiding certain panels and fields, setting security groups and managing notifications.
1.- Content Edit Lock Down: This includes settings like "Hide Publication," which hides the Publication Panel in the Article Detail screen during edit mode. This panel includes fields such as Creator, Account, Publish Start, Publish End, Embargo End, Syndication, Live, Private, and Moderated.
2.- Security Groups: You can set different security groups for content creation and publication. For example, the Creation group might be set to "Contributor," while the Publish group might be set to "Editor." This ensures that the appropriate restrictions are applied to users based on their roles.
3.- Notifications: The Workflow Profile also includes a Notifications panel where you can enable or disable notifications for various events, such as content submission or approval. You can customize the text of these notifications to suit your needs.
Seting up the Workflow Profile:
1.- Set up the Creation security group for your Clients
Control > Security > Security Groups> (Add)
This group will allow your Clients to create and submit directories and articles for approval before they go Live.
2.- Set up the Publish & Archive security group for your Clients
The users in this group will be able to review and approve/publish the directories and articles.
Note: users in the Publish and Archive security group will need the Publishing Workflow and the Publishing Workflow User system security right in order to access the Inbox screen to moderate the content.
Tip: you can add those security rights whilst creating the security group
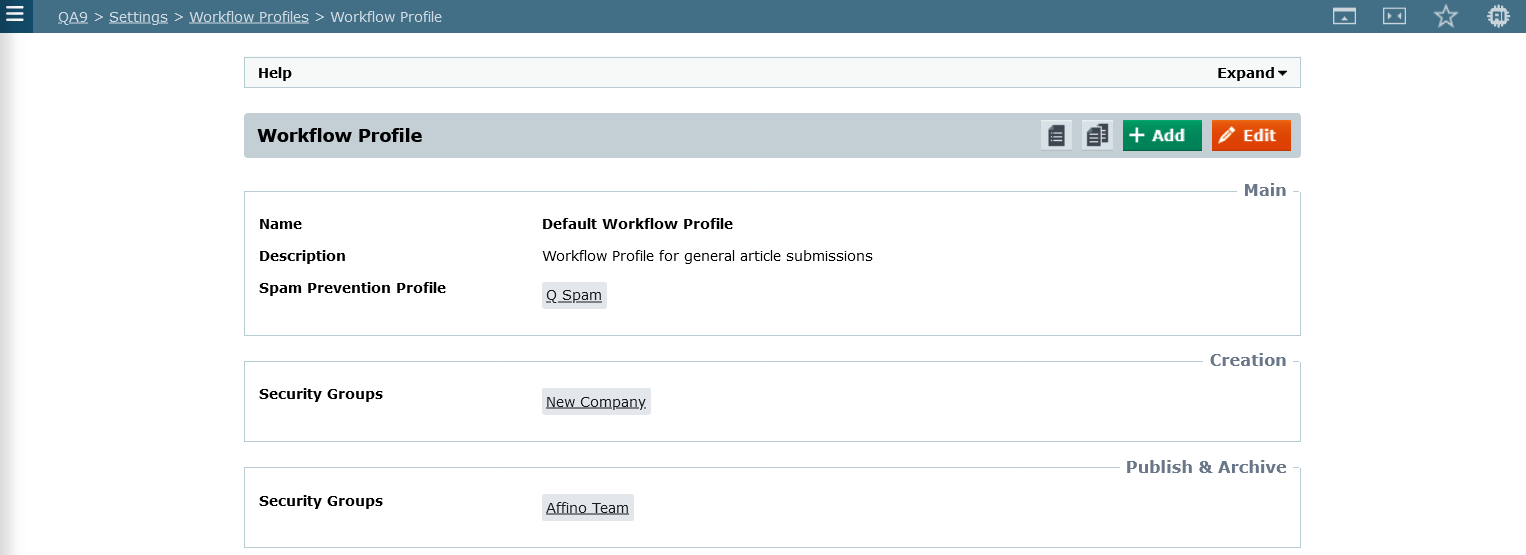
3.- Add the security groups to the new workflow profile
Control > System > Workflow Profiles> (Add/Edit)
4.- Directory Lock Down (Control)
- Hide Online Directory Options: Select to hide from users
5.- Directory Self Service (Display Side)
Further down the workflow profile screen there is the Directory Self Service panel.
This panel has two settings:
- Show Add Directories: Select this to allow users to add their own directory entry. The add button would appear on the Directory Listing screen
- Hide WYSIWYG: Select this to hide the WYSIWYG tool on all text fields. If selected, users would see a text-only field
For 'Show Add Directories, the add button would appear on the Directory Listing screen.
For 'Hide WYSIWYG', the users would see a text-only field.
Relate the Workflow Profile to the Channel
Settings > Workflow Profiles
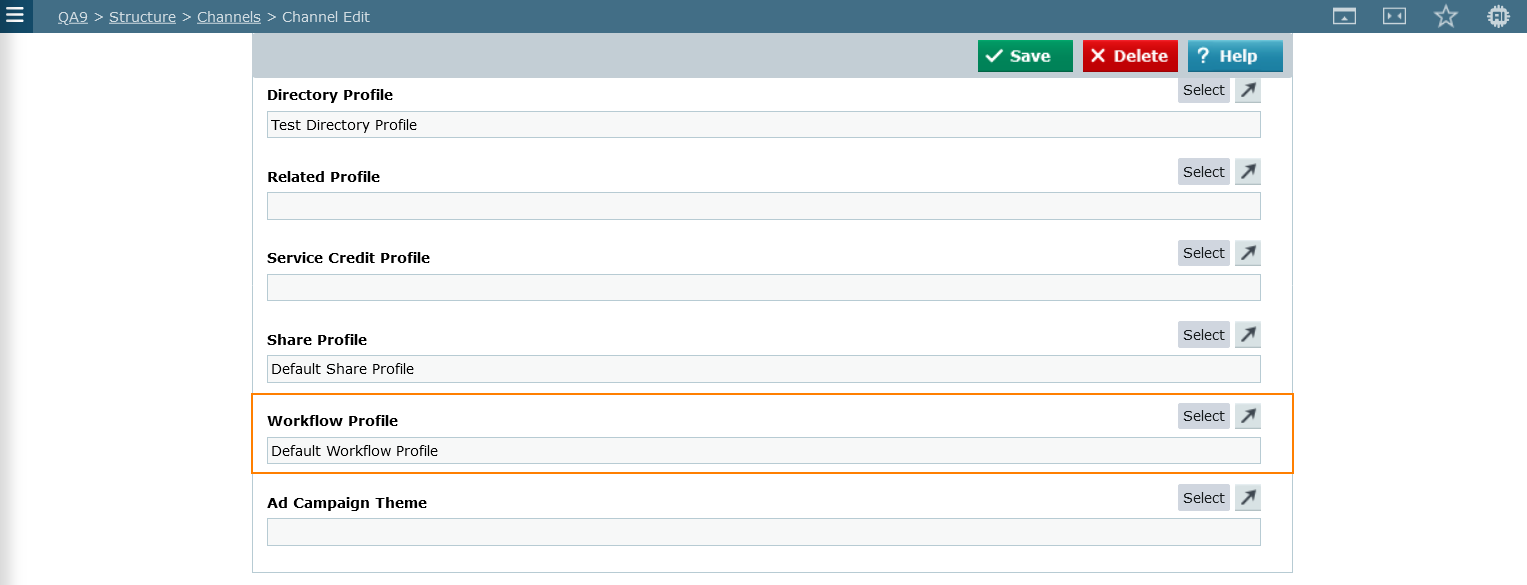
Structure > Channels > Channel Edit > Profiles > Workflow Profile
Once setup, you will need to associate the specific Workflow Profile to the Directory or Directory Articles channel so that the submission and approval process can be implemented.
Content Submission and Approval
When a Client adds a directory or a directory article they will see the Save as Draft and Submit buttons.
The Client can either save the item as a draft or submit for review/approval.
The items that have been Submitted, set as Draft, Approved and Rejected will be listed on the Manage Directories screen.
Note: a user cannot edit or delete an article once it has been submitted or approved
Workflow Profile and Buttons
The Live and Save buttons will appear or not, depending the user's role and if there's a Workflow Profile associated to the channel.
1.- With a Workflow Profile
Creators/Contributors will only see the "Save As Draft" and "Submit" buttons. The "Live" checkbox will be absent.
Editors (those who review and publish the article ) will see the "Save & Publish" button. Clicking on that button will automatically make the article Live. The "Live" checkbox is hidden.
2.- Without a Workflow Profile
Only the "Save" button will be displayed. The user needs to manually check the "Live" checkbox to make the article live.
This logic ensures that the publication process is streamlined based on the presence of a Workflow Profile and the user's role in the content creation and approval process.
Content Review and Approval/Rejection
Once a directory or an article has been submitted, the Admin will see the item on the Inbox screen:
Control > Content > Inbox
The approval or rejection can also occur on the items detail screen.
When the Admin approves the item, it becomes Live immediately.
If the Admin rejects the items, a modal appears with the option to send a notification to creator.
Content (Media) Limitations for Directories
Set the type of content (Video, Image, Document, etc) together with the amount and size that a Client can upload by means of the Directory Step Profile.
Control > System > Directory Step Profiles> (Add/Edit)
Set the content type and media format, number of upload per format and the size limit for each.
This will be reflected on the Clients directory media options.
Please see the Directory Setup Guide for more information.
Topic Limitations for Directories
Set the amount of topics that a Client can tag their directory with by means of the Directory Profile > Topic options.
Control > System > Directory Profiles> (Add/Edit) > Topics Limit
Please note that this limitation is applied to the article profile set to the directory channel.
Provide a name for the tier (i.e. Diamond), establish the (child) topic limit (i.e. 10) and apply the related security (this will be a previously created Content Security Right, i.e. Diamond Limit).
Once you have set the topic limits you can apply the Directory Profile to the specified channel/section:
Once saved, your Client will see the article profile reflected on the Directory edit screen.
Topic and Article Limitations for Directory Articles
Set the amount of topics that a Client can tag their directory articles with, together with the amount of articles they can upload, by means of the Directory Articles Profile.
Control > System > Directory Article Profiles> (Add/Edit) > Directory Article Limit
Similar to the Directory Profile, the Directory Articles Profile allows you to define how many articles a Client can upload and the amount of child topics available to them on the Category Topic dropdown.
Example:
You’ve set the Diamond tier to have a Directory Article Limit of 10.
The amount will be reflected on the Articles add/edit page.
The topic limitation will also be reflected on the add/edit page.
Security
Control > Structure > Sections> (Add/Edit) > Security > Default Article Security Clearance
Control > System > Workflow Profiles> (Add/Edit) > Restrictions & Duplicates > Auto Assign Security
When your contributors or users add a directory entry or a directory article, the self-service workflow applies the security clearance set on the section where they are created to the directory or article.
Please bear in mind that if the Directory or Directory Article channel has a workflow profile in place, and the workflow profile has the 'Auto Assign Security' option enabled, the Security Clearance set in the workflow will be applied to the item.
The above will supersede the security set on the section.
Notifications
Control > System > Workflow Profiles> (Add/Edit) > Notifications
The Notifications panel on the Workflow Profile provides several options that you can enable and disable, such as notifying Publishers once the content has been submitted, or notifying the Creator of its approval.
Also customise the text on the notification.
On-screen notifications
For a better user experience, the Self Service workflow adds a status label on the directory and article entry.
This helps the user know what the status of the new directory or directory article.
The Self Service workflow also shows a rejection message on top of the entry and article.
Your contributors and/or users can see the message note on the screen while working on it.
Text Items
The Directory, Directory Article and Workflow profiles all have Text Items.
These allow you to customise the labels, buttons and messages that are shown to users.
The Text Items panel is located at the bottom of the screen. You can also customise the Text Items via de App Bar.
Messaging
Users have the ability to message the Supplier by means of the Contact Supplier button.
If you click on that button, Affino will take you to the My Messages screen so you can get in touch with the supplier.
Directory infrastructure updates
The directory infrastructure received two operational improvements that don't change how you set up or use a directory but do affect day-to-day reliability:
- Temporary directory cleanup - staging files generated during directory operations are now removed automatically when the operation completes, preventing the slow accretion of orphan files that previously needed manual cleanup.
- Smart directory download spacing - concurrent directory downloads are now spaced to avoid overlapping I/O, which improves consistency for sites with high directory-download volume.
Neither change requires reconfiguration. Existing directory setups continue to work unchanged. The improvements apply automatically to all directory-type guides including those linked under the Source links below.
Best Practices
Default to moderator review for the first 30 days. Self-service spam is common in early launches; review catches the worst patterns before they propagate.
Keep the listing form short. Self-service forms with 15+ fields have 70%+ abandonment rates. If your schema needs that much detail, split into a quick-create flow + a "complete your listing" follow-up.
Use Tracking Link settings to measure listing engagement. Self-service contributors abandon listings that get no traffic; data-driven feedback ("your listing was viewed 47 times") increases retention.
For member-only directories, gate the Add flow behind a Security Group. Anonymous self-service is rarely the right pattern.
Gotchas
Submit-for-review and Save-as-Draft are separate states. A contact who clicks Save expects their listing to be visible later but it isn't published yet - they need to come back and Submit. The UI distinguishes the two but contacts often don't notice.
Moderator-rejected listings remain in the contact's account. Rejection doesn't delete; the listing stays as Draft for the contact to revise. Operators expecting rejection to clear the slot will see the queue accumulate.
Self-service contributors can edit their published listings without re-review unless the Profile is configured to re-queue on edit. A contact can publish clean copy then revise it to spam. Lock edits to re-review for sensitive directories.
Did you find this content useful?
Thank you for your input
Thank you for your feedback

Driving business at some of the world's most forward thinking companies











Our Chosen Charity


Meetings:
Google Meet and Zoom
Venue:
Soho House, Soho Works +
Registered Office:
55 Bathurst Mews
London, UK
W2 2SB
© Affino 2026