Catalogue Items Guide
Overview
Control > Commerce > Catalogue Items
Set up are your eCommerce Items, generated from a Product Article (Product Presentation Style).
Note: currently, Affino does not support purchasing a product/catalogue item without logging in.
Users attempting to buy an item while not logged are forced to register or login before they can proceed with the purchase. There is no guest checkout option available yet.
What is a Catalogue Item?
A Catalogue Item is a product or service that can be ordered individually via eCommerce or manually, such as a Pro Forma Order.
For example, a product or a service can be a:
- Subscription (weekly / monthly / yearly / etc)
- Event (ticket)
- Report (PDF)
- etc.
A Catalogue Item contains the product settings for a product such as the price and payment method whilst the associated Product or Event Article contains the product infromation.
How to create a catalogue item
You cannot create a new catalogue item from the listing or detail screen.
You must first:
1.- Create an article using one of these templates:
- Simple Event
- Advanced Event
- Product
- Advanced Product
Control > Publish > Articles > Standard Item Edit
After its creation click on the eCommerce button and you will be presented with the Catalogue Item Add/Edit screen.
Fill in the required fields and create the related product catalogue item.
2.- You can also create a catalogue item from a media item.
Control > Media > Media Items > Media Item (detail screen)
Using the same method as with an article, click on the eCommerce button and fill in the requiered fields on the next screen.
3.- You can also create a catalogue item (or several) by means of an import.
Control > Commerce > Catalogue Items Import
Note: make sure to use the latest sample file (Main > File: "download a sample xlsx file here") so that the import is successul and you dont miss any key fields that need values.
For more information on catalogue item imports, please see the Importing and Exporting Catalogue Items guide.
Note: you cannot duplicate a Catalogue Item.
There is no copy or duplicate function on the Listing and Detail screens. A workaround would be to copy the related product article, that will also create a copy of the catalogue item. After you copy the product article click on the eCommerce button at the top in order to access the copied catalogue item.
Difference in Product Articles
Products have different presentation styles, thus on the display side/front-end, they appear different.
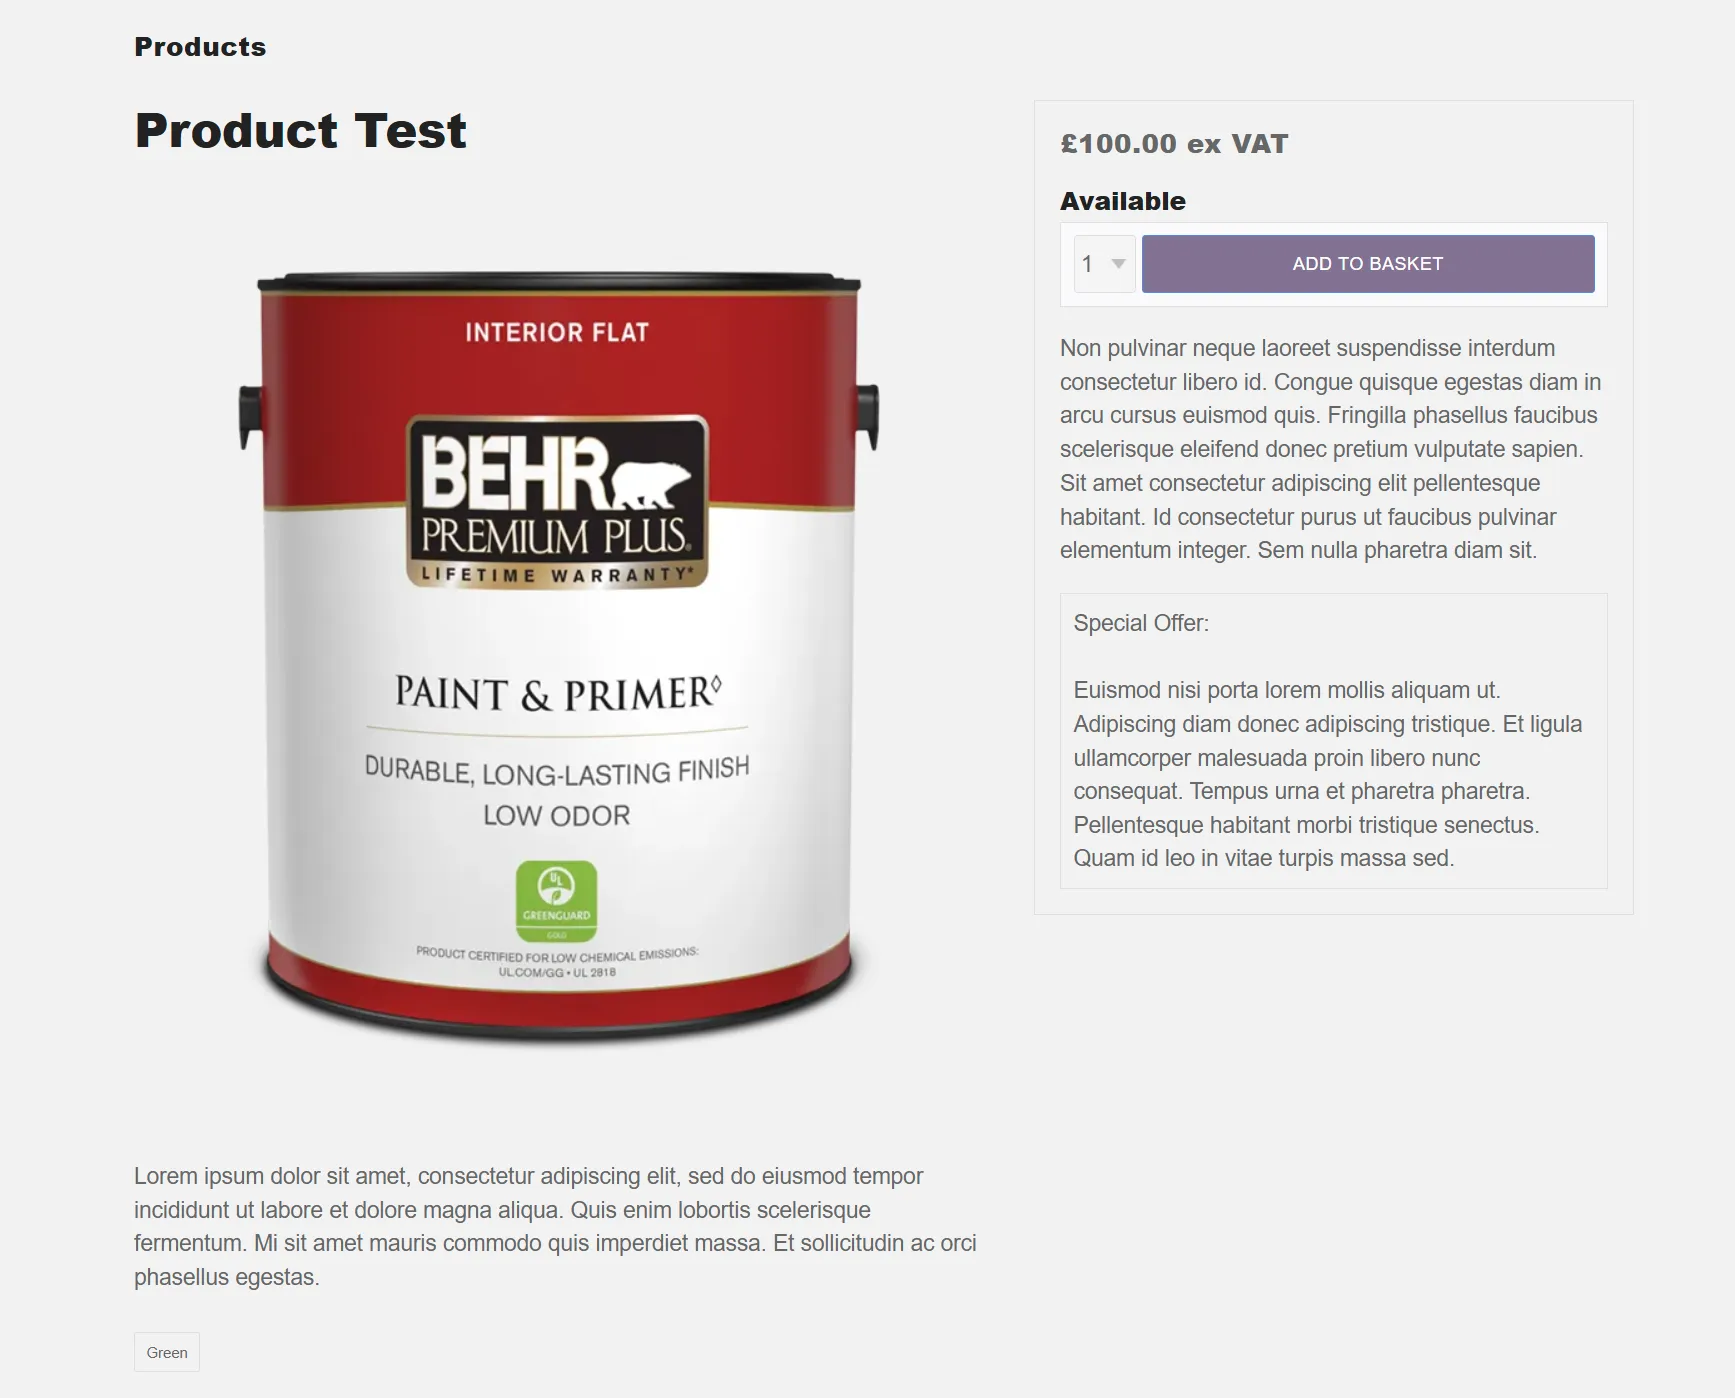
Product
The Product presentation style doesnt use tabs. It displays the Main Details below the image and the Additional Information and Special Offer Text fields to the side.
Advanced Product
The Advanced Product presentation style displays the Main Details and Additional Information text below the image, segmented in tabs. The Special Offer text dis shown on the sidebar to the right.
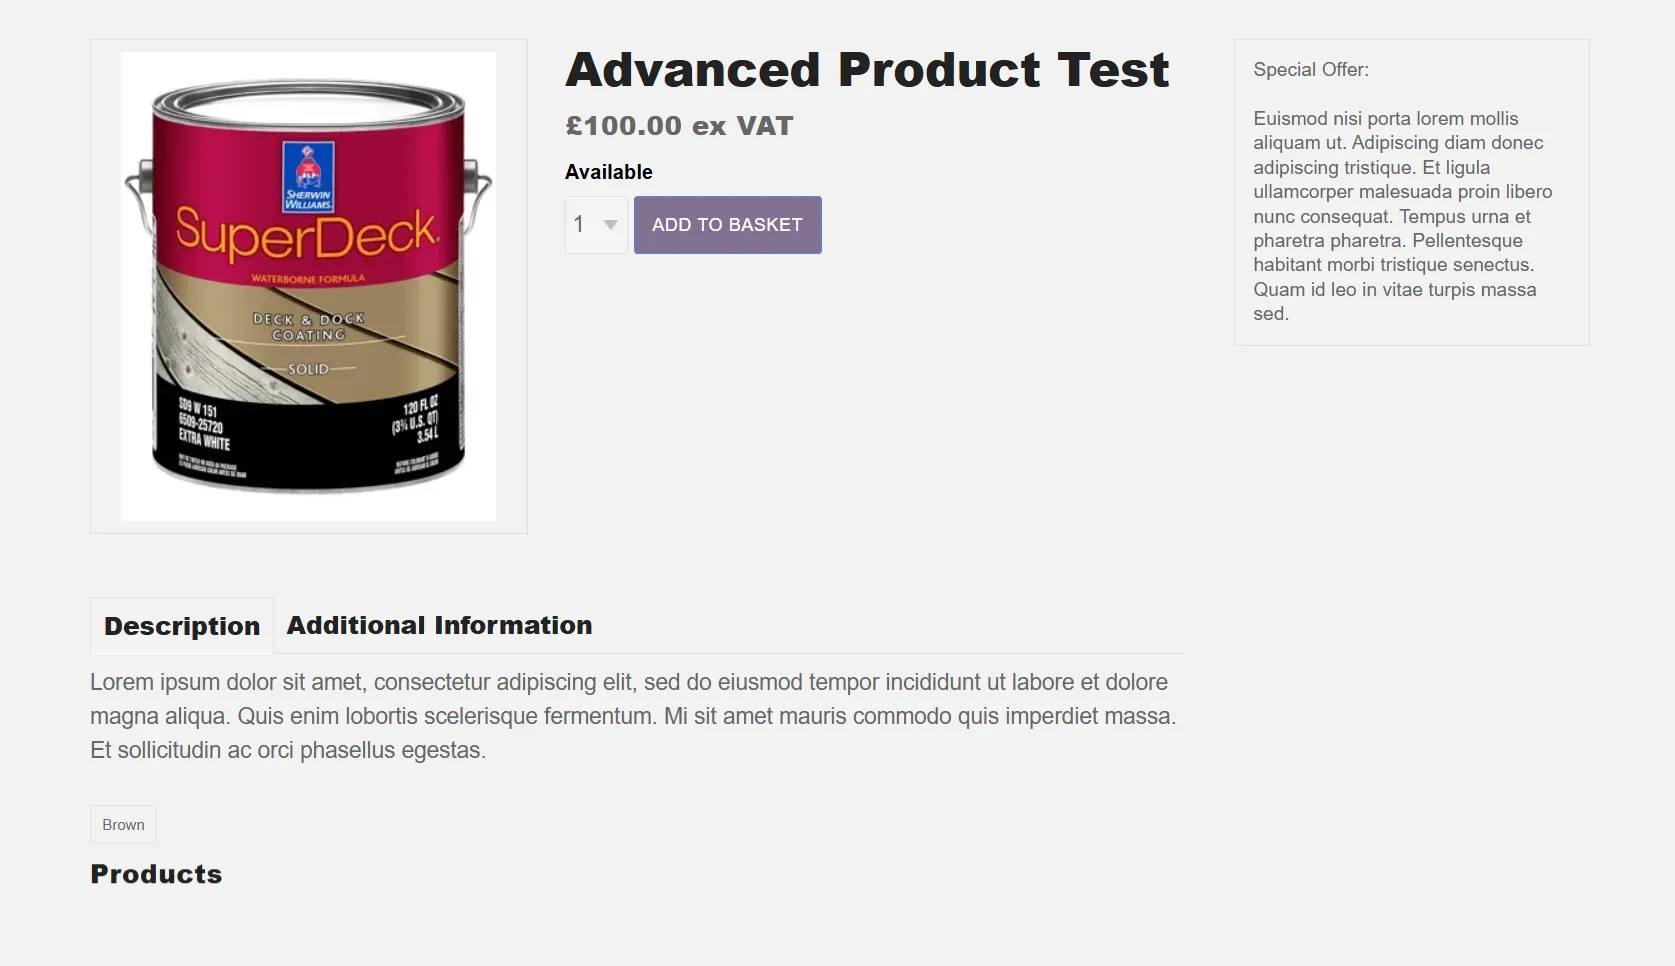
Note: if the Product Article is not displayed on the Product Listing, please check if its
- Live
- The Publish Start and Publish End dates are correct
- The Product Article has an associated Catalogue Item
Main Panel
Fields:
- Name:
- This will be the name of the catalogue item you are going to create. It is derived from the associated article name.
- Catalogue ID:
- Enter your own alphanumerical reference for this Catalogue Item. [required]
- Product Line:
- Select the required product line for this Catalogue Item.
- Product Category:
- Select the required product category for this Catalogue Item.
- Catalogue Group Title:
- Enter the title displayed on the basket when this item is part of a Catalogue Group. e.g. Monthly Subscription Direct Debit, Monthly Subscription Credit Card, etc. (this is needed to differentiate between the items within a Catalogue Group)
- Country Group:
- Select the Country Group to organise this Catalogue Item into. Used in conjunction with Catalogue Groups, this is used to automatically display a Country Group dropdown menu on the Product detail to link to a different set of products depending on where the product needs to be shipped.
Price Matrix Panel
Fields:
- Price (row):
- Previous Price
- Cost Price
- Price Note
- Valid From
- Valid To
- Currency
- Security
- Sell Only In
- Select to only allow sales of this item in the currency selected here
- Maximum Basket Limit:
- Enter a limit on how many of these items each customer can purchase (add to the basket) per order. If you enter '0', it denotes there is no limit on the item. Note: For subscription, customers can only purchase 1 subscription per order so this field is not used.
- Maximum Lifetime Limit:
- Enter a limit on how many of these items each customer can purchase in their lifetime. If you enter '0', it denotes there is no limit on the item.
- Coupons & Discounts:
- Tick option to allow Coupons and Discounts to be assigned to this Catalogue Item
- Special Offers:
- Tick to make this item a Special Offer. This will apply the Special Offer Image overlay (from the Store Profile) to the product image.
- Tax Rule Override:
- Select if you wish to override the Tax Rule from the Store Profile for this Catalogue Item. This only applies versus the default Tax Rule as set on the Store Profile, so that if you have a 20% tax as default and wish to set a 5% Tax Rule on this catalogue item then you will use this. Otherwise not. Note that for different taxation levels in different countries, that is managed through Trading Zones, whereby you assign individual Tax Rules to specific trading zones. Note also that you only select a single Override Tax Rule per Store.
- Payment Method:
- Select the Payment Method to be used on this Catalogue Item. If a Payment Method is selected, the customer will only be able to add items to the basket with the same Payment Method and for Direct Debit and Continuous Credit Card payments, only one item can be purchased at a time. Note: This is required if this item is to be added to a Product Group. If left blank, all available Payment Methods will be displayed on the Checkout (for items not part of a Catalogue Group).
Health Check
The 'Health Check' for Catalogue Items is a dedicated panel added to the Catalogue Item view screen (Control > Catalogue Item > View) to help users ensure their catalogue items are configured correctly and avoid common setup errors.
This panel appears below the Price Matrix panel and runs multiple checks, displaying advisories with expandable/collapsible explanatory text similar to the SEO Health Check on articles.
Key aspects of the Catalogue Item Health Check include:
Product Line and Product Category: Checks if a Product Line and Product Category are selected. Advisories encourage selection to help segment or filter sales by brand or product type.
Payment Method: Verifies that a Payment Method is selected. If none is selected, the checkout will display all available payment methods from the Store Profile, including Purchase Order.
Pricing Checks:
- Detects if any price in the pricing matrix is set to zero, prompting a review.
- Checks if the Renewal Catalogue Item price is zero.
- Validates that the price set on the catalogue item matches the price configured in payment gateways like Stripe or PayPal, displaying messages if mismatches occur or if API errors prevent verification.
Payment Method Status: Warns if the selected payment method is not live, meaning it won't be available at checkout.
External ID Presence: For payment methods like Stripe and PayPal, it checks that an External ID is present and correctly mapped to a product on the payment gateway. This check is not applied to GoCardless, as its External ID requirement was removed.
Renewal Catalogue Item Checks:
- Confirms the Renewal Catalogue Item is live
- Checks that the payment method on the Renewal Catalogue Item matches the original Catalogue Item to avoid incorrect recurring payments
- Verifies the presence of an External ID on the Renewal Catalogue Item
- Ensures that "Start Renewal Automation" and "Use Renewal Catalogue Item Price And Tax" settings are enabled on the payment gateway where applicable
Subscription Plan and Automatic Renewal:
- If "Enable Subscription" is ticked, it checks that a Subscription Plan is selected
- If a Renewal Catalogue Item is selected, it verifies that Automatic Renewal is enabled
Product Article Live Status: Checks whether the associated product article is live. If not, it warns that while preview and purchase are possible, viewing in private mode will prompt a login screen.
Sale End Date: Advises if the Sale End date is within one month, prompting users to confirm if this is intended.
Note: only advisories relevant to the current configuration are shown; checks that pass are not displayed to avoid clutter
This Health Check panel greatly simplifies the product setup process, helping users avoid common mistakes related to payment methods, pricing, subscription plans, and renewal configurations, thereby ensuring smoother checkout experiences and accurate subscription renewals.
Inventory Panel
Fields:
- Shipping:
- Tick option to enable Shipping Costs to be assigned to this Catalogue Item
- Shipping Information:
- Enter Shipping Information for delivery; e.g. Delivery via Royal Mail, etc. This is displayed on the product listing and email receipt. Note: Use the Delivery Time Frame functionality if you wish to set up predefined delivery timeframes instead which is shown on the Checkout screen.
- Google Merchant Centre Shipping Price:
- Define a shipping price to export to Google Merchant Centre, this will have no affect on the actual shipping price which is defined by the relevant shipping profile.
- Weight:
- Enter the weight of this Catalogue Item if applicable. Weight Units are set on Store Profiles, Kilograms tends to be the default value.
- Inventory:
- Tick option to enable Inventory Management on this Catalogue Item.
- Stock Level:
- Enter the number of units you have in Stock for this Catalogue Item.
- Stock Location:
- Enter in a location for this stock item.
- Delivery Time Frame:
- Select the delivery time frame to apply to this catalogue item.
- Non-Availability Status:
- Enter an non-availability status message for this catalogue item, e.g. Temporarily Unavailable, In Print, Awaiting Delivery.
- Original Pledge Inventory Level:
- Enter the number of pledge items available for this category item. This amount should not change and will be displayed as "x of y remaining" with y being the amount entered here. As items are sold, x will reduce and customers will not be allowed to purchase more than are available. If left blank, this will not be displayed.
Subscription Panel
Fields:
- Enable Subscription:
- When this option is ticked the subscription fields are activated
- Note: when this option is enabled, Affino automatically checks for an associated Subscription Plan; if one is not selected, the "Enable Subscription" field label will be highlighted in red and the advisory text will change from "tick to activate Subscription" to "Please select a Subscription Plan if needed". If the subscription option is subsequently disabled, the field reverts to its original advisory text: "Tick to activate subscription"
- Subscription Plan
- Select the Subscription plan associated to this Catalogue Item. A related digital good will be created for each Subscription Plan selected. Please note that you can only select a single subscription plan for recurring payments.
- Deferred Income:
- The Deferred Income field will only work in conjunction with the Subscription Duration fields in one of the following combinations (Deferred Income / Duration):
a). Monthly / [3 Months, 6 Months or Year]
b). Bimonthly / [6 Months or Year]
c). Quarterly / [6 Months or Year]
d). Biannually / [Year]For automatic renewals via Stripe or GoCardless, the Duration must be 1 Month, 1 x 3 Month, 1 x 6 Month or 1 Year.
- The Deferred Income field will only work in conjunction with the Subscription Duration fields in one of the following combinations (Deferred Income / Duration):
- Subscription Payment Duration:
- Select the payment period for the subscription over the course of the year, e.g. 12 monthly payments, 4 x 3 month payments, 1 yearly payment. This also determines the length of the paid subscription.
- Subscription Duration Number:
- Enter the Subscription Duration Number with reference to the above Subscription Payment Duration, e.g. 12 monthly payments, 4 x 3 month payments, 1 yearly payment.
- Automatic Renewal:
- Automatic Renewal cannot be used in conjunction with a Duration Period of Hours or Days. The Duration Number must be set to 1.
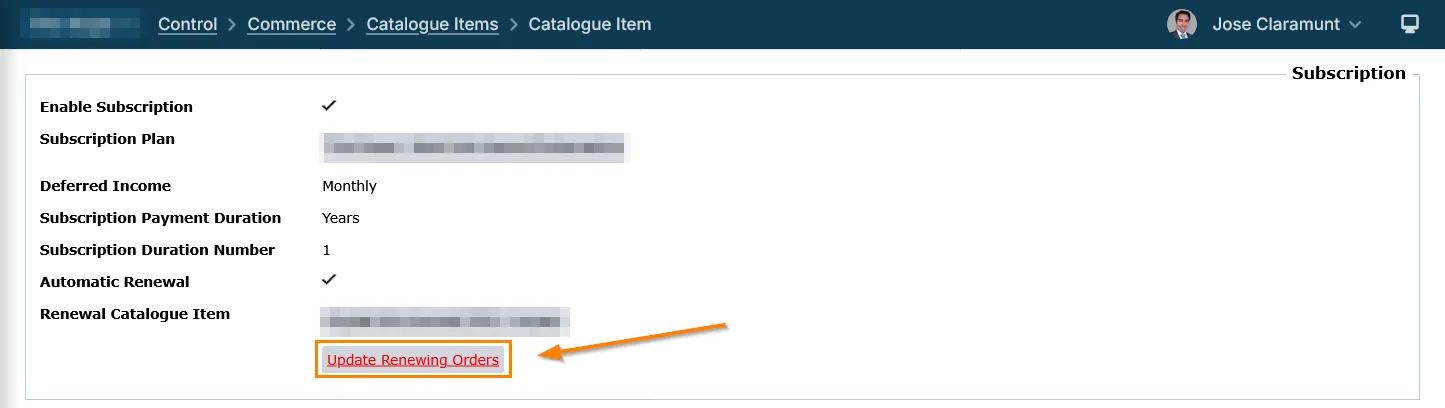
- Renewal Catalogue Item:
- Select the renewal catalogue item. This could be used where there is a price change, the original item is no longer on sale or there are new benefits.
Note:
Subscription Panel -Update Renewing Orders
The Update Renewing Orders function is a control-side feature used to retarget unpaid, already-generated renewal orders to a new Renewal Catalogue Item. This ensures that price changes, tax updates, etc, are correctly pushed to both the order and the payment gateway.
When to Use It:
Use this function whenever you update a catalogue item (pricing, tax, or setup) and need to capture existing renewal orders that were generated before the change was made.
How to Access the function:
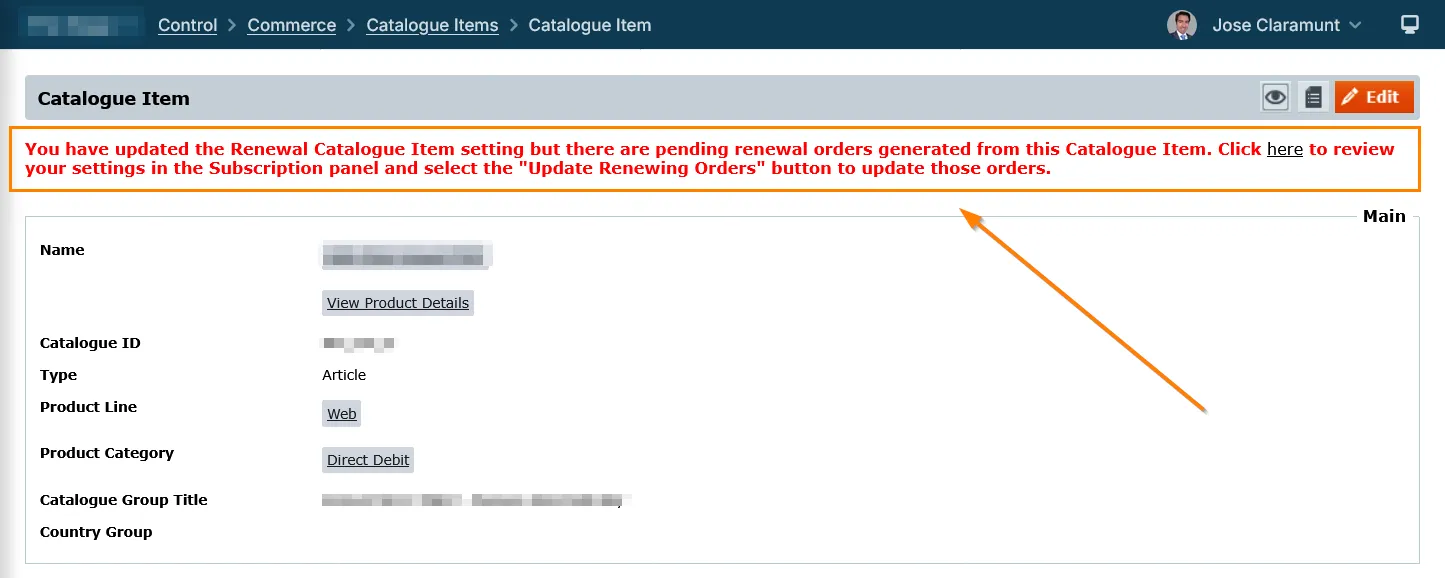
1. Modify the Item: On a Catalogue Item in Control, change the Renewal Catalogue Item and click Save
2. Check for Alerts: Affino will scan for unpaid orders still linked to the old item
3. Locate the Button: If affected orders exist, a red advisory message will appear at the top of the screen, and an Update Renewing Orders button will appear below the Renewal Catalogue Item field
What Happens During the Update?
- Affino Updates: The order is switched to the new Catalogue Item. Duration, price, and tax are recalculated automatically.
- Payment Gateway Sync: For supported gateways (like Stripe or GoCardless), Affino sends the new price, tax, and product ID to the gateway to ensure the next charge is correct.
Note: For Stripe, the "Use Renewal Catalogue Item Price And Tax" setting must be enabled on the payment gateway for these changes to sync.
Why This Matters:
- Accurate Billing: Ensures customers are charged the new rate and receive the correct subscription benefits.
- Audit Trail: Every change is logged in the Order Audit panel (Order > View), showing who changed the item and when.
- Avoids Mismatches: Without this function, existing orders would remain on the old pricing/item, leading to financial discrepancies between Affino and your payment gateway.
Updating Renewing Orders
When the Renewal Catalogue Item is changed on a Catalogue Item, existing, unpaid renewal orders are not automatically updated with the new pricing. This means customers with these orders would renew at the old price, which could lead to:
Incorrect billing: Customers being charged the wrong amount.
Customer dissatisfaction: Confusion and frustration when they don't receive the expected pricing.
Revenue loss: The business not collecting the correct revenue for renewals.
To address the above, Affino has a new function which identifes and updates the affected renewal orders.
The function work as follows:
Trigger: Renewal Catalogue Item Change: The function is triggered when a user edits a Catalogue Item and changes or adds a Renewal Catalogue Item.
Identifying Affected Orders:
Affino runs a query to find all unpaid renewal orders that were generated using the previous Renewal Catalogue Item (if one existed).
User Notification and Action:
An "Update Renewing Orders" button will appear in two places on the Catalogue Item view screen: below the Renewal Catalogue Item details and at the top of the screen.
This button alerts the user that there are orders that need attention.
Listing Affected Orders:
When the user clicks "Update Renewing Orders," a list of affected orders is displayed.
Each order is listed with relevant details (Order No., Customer, Total, etc.) and a checkbox to select it for updating.
Updating Orders:
The user selects the orders they want to update and clicks the "Update Orders" button.
The system then updates the selected orders to use the new Renewal Catalogue Item.
If the price, tax, or coupon details have changed, the system also sends these updates to the payment gateway to ensure the correct amount is charged.
Handling Large Numbers of Orders:
To prevent performance issues, large updates (over 20 orders) are handled as a scheduled task. The user receives an email notification when the update is complete. Smaller updates (under 20 orders) happen immediately.
Audit Trail:
The order audit log is updated to reflect the change in Catalogue Item, providing a record of who made the change and when.
In Essence:
The Update Renewing Orders function provides a user-friendly interface to identify and update existing renewal orders when the Renewal Catalogue Item is changed, ensuring accurate billing and a smooth renewal process. It bridges the gap between Catalogue Item updates and existing orders.
Note: If using a Renewal Catalogue Item with Stripe or GoCardless, please ensure the Renewal Catalogue Item Price And Tax is enabled on the Payment Gateway.
Media Item Downloads (Related Goods)
- Select to enable download duration for Media Items. If not selected, users can download their Media Items any time.
- Download Duration
- Select the duration period for Media Item downloads. This is the time period that the user can download their purchased Media Items.
- Download Duration Number
- Enter the duration units with reference to the above Download Duration, e.g. 1 year, 6 months.
Attendee Details Panel
Fields:
- :
- Select to assign the purchaser as an attendee of the event by default, only their First Name, Last Name and Email will be captured. They will still be able to access 'My Account' to add additional details.
- Capture Attendee Details
- Choose an option to assign attendees with the Order Line Item. This means that customers can add attendees to the order (based on quantity purchased, a specified quantity or unlimited contacts), particularly useful for managing event delegates or course participants. Customers will be required to fill in the attendee's first name, last name and email post-purchase through their My Account screen.
- Number Of Attendees:
- Please input the number of attendees to assign for this catalogue item. This field is only relevant if you selected By Quantity Specified in the above dropdown.
- Capture Additional Details:
- Select to capture additional details of the Contacts. Ctrl-Click / Cmd-Click to select multiple options
- Custom Field 1:
- Enter custom label to request further information about the attendee.
- Custom Field 2:
- Enter custom label to request further information about the attendee.
- Custom Field 3:
- Enter custom label to request further information about the attendee.
- Add To Contact List:
- Select the Contact Lists to add assigned attendees. Attendees will only be added to the Contact List once you click Create Contact or Merge Contact on the Attendees management screen.
- Allow User Cancellation:
- Select to allow users to cancel attendance only on free bookings or bookings made using Event Credits.
- Cancellation Cutoff Days:
- Enter the number of days prior to the event start where users can cancel their attendance. This is calculated against the Event Start set on the Article.
Note: you need to enable the "Capture Attendee Details" option for customers to be added to a Contact List. So if you use the "Add To Contact List" option, please enable the "Capture Attendee Details" option as well.
Additional Info Panel
Fields:
- External ID:
- Enter External alphanumerical reference for this Catalogue Item
- Product Message:
- Enable this to allow for customers to add a custom or predefined message at the checkout stage
- Acknowledgement Message:
- Enter a short message or instruction displayed on the Acknowledgement screen for users who purchase this item. This may be useful for adding a link to a certain screen after purchase
- ISBN:
- Enter the ISBN (International Standard Book Number) for the product
- ASIN:
- Enter the ASIN (Amazon Standard Identification Number) for the product
- EAN:
- Enter the EAN (European Article Number) for the products
- UPC:
- Enter the UPC (Universal Product Code) for the products
- GTIN:
- Enter the GTIN (Global Trace Item Number) for the products
- Store Credit Multiplier
- Use this setting to set the multiplier for the Catalogue Item. This will allow some items to have double / triple credits allocated, as well as having exemptions which have no credits
Gift Panel
Fields:
- Allow As Gift:
- Select to enable this catalogue item to be sent as a gift
- Select to allow the purchaser to select a different subscription start date. A date field will be displayed on the basket screen.
- Gift Option Default:
- Select to enable the Gift option to be selected as default on the basket
- Gift Message Subject:
- Enter a Subject for the gift message
- Gift Message Body
- Enter a Message Body for the gift message. If Enable Subscription is also selected, this message will be sent on the day the subscription starts
- Note: The recipient will need to register and login to access the subscription
- You can use the following placeholders within the message: [_Recipient_First_Name_], [_Recipient_Last_Name_], [_Sender_First_Name_], [_Sender_Last_Name_], [_CatalogueItem_], [_Start_Date_].]
- Gift Message Recipient
- Select to whom the Gift Message should be sent to on the subscription start date.
- Gift Purchaser Message Subject
- Enter a Subject for the gift purchaser message.
- Gift Purchaser Message Body
- Enter a message sent to the purchaser of a gift subscription on the purchase date. You can use the following placeholders within this message: [_Recipient_First_Name_], [_Recipient_Last_Name_], [_Sender_First_Name_], [_Sender_Last_Name_], [_CatalogueItem_], [_Start_Date_].
Modifiers Panel
Fields:
- Catalogue Attribute Profile:
- Select Catalogue Attribute Profile
Permission Panel
Fields:
- Permission:
- Select up to 5 permission statements to be listed in a popup to validate a user's eligibility to purchase this item. If more than one permission is selected, they will be listed with radio buttons, otherwise a checkbox will be displayed
- Disclaimer:
- Select a disclaimer to be displayed in a popup to confirm a user's acceptance before purchasing this item. If used in conjunction with the Permission field, the disclaimer will be displayed after the permission is selected
Security Panel
Fields:
- Content Security Right:
- Use the drop-down to select a Content Security Right with which to restrict viewing access to this Catalogue Item.
Publication Panel
Fields:
- Sale Start:
- Choose the date and time when this item will be on sale
- Sale End
- Choose the date and time when this item is removed from sale
- Live:
- Tick this option to put this Catalogue Item On Sale
- Syndication To Stores:
- Select to syndicate your catalogue items to external stores, e.g. Amazon
Did you find this content useful?
Thank you for your input
Thank you for your feedback
Driving business at some of the world's most forward thinking companies


Our Chosen Charity
![]()
Meetings:
Google Meet and Zoom
Venue:
Soho House, Soho Works +
Registered Office:
55 Bathurst Mews
London, UK
W2 2SB
© Affino 2026